Publishing content to your WordPress site is as easy as using a word processor. With WordPress’s built-in text editor, you can type and format text, add images, add links, quotes, video links and much more.
Use this document to familiarize yourself with basic concepts for publishing posts and pages.
- Publishing tools
- Posts and pages
- Posts overview
- Create new post
- Categories and tags
- Pages overview
- Create a new page
- Delete posts and pages
- Moderate comments
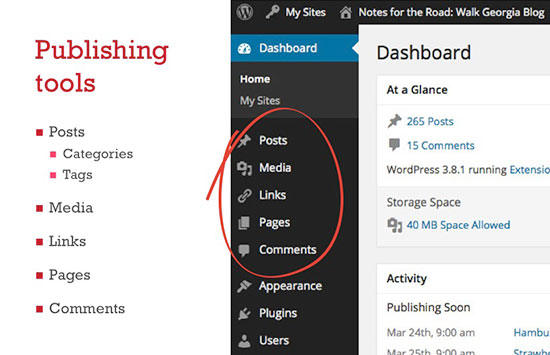
Publishing tools
Access the publishing tools in WordPress by browsing to the menu on the left side of the page. Publishing menu options include posts, media, links, pages, and comments.
Posts and pages
A WordPress site typically consists of multiple articles, or posts, that are dated, have categories and authors, and are displayed in reverse chronological order. If someone subscribes to an RSS feed of your WordPress site, they will be provided an alert to the most recent posts on your WordPress site, as you publish them. See Posts overview below for more information.
In simple terms, pages are static, do not have a date associated with them, cannot be categorized, and do not show up in archival lists. An “About” page is a typical static page that your WordPress site might have. You can also use custom page types to create other informational pages for your WordPress site. See Pages overview below for more information.
Posts overview
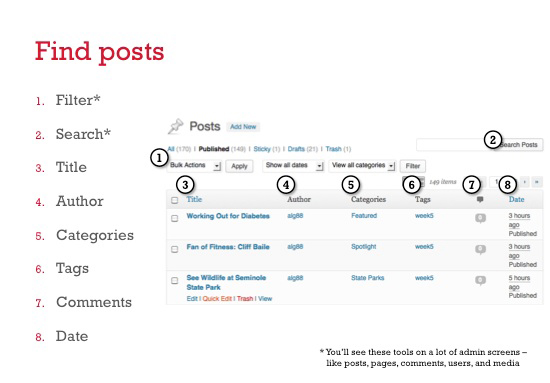
If you click on the Posts link in your menu, you will get a general listing of all the posts in your WordPress site. This page includes filter and search tools and also lists the title, author, categories, tags, comment numbers and publish date for all posts on your WordPress site. Depending on your user role, you may only be able to edit your own posts and not posts of other authors on the same WordPress site.
Finding a post
You can use the tools at the top of the page to narrow the list by searching for a certain post, or you can filter posts by category or date. If you want to see all the posts by a particular author, just click on their name in the Author column.
Editing basic post information
Click on “Quick Edit” under any post to edit basic information about the post. You can use this option to quickly credit a different author for a post, change a post’s status, turn comments off and on, and add categories and tags. You can also edit things like the title, slug, and publish date.
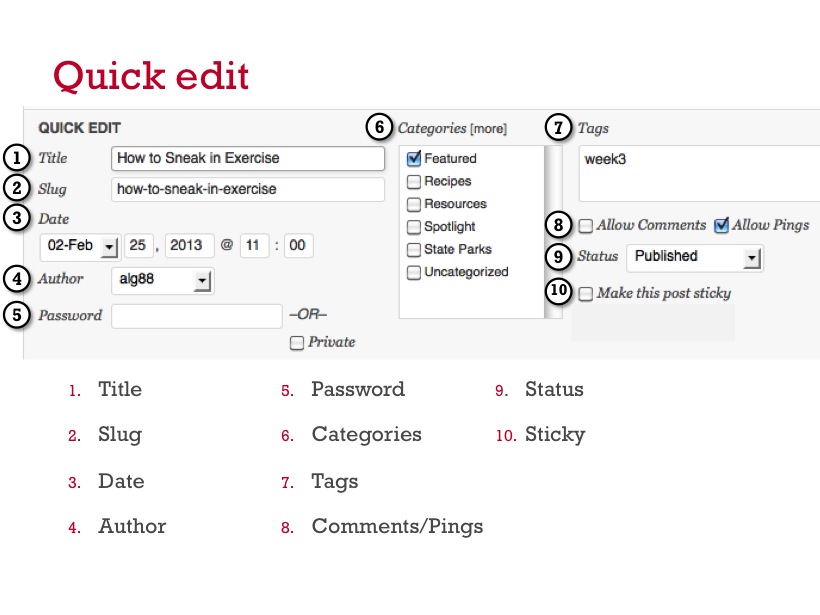
- Title: make quick changes to your post’s title.
- Slug: this is typically the last section of the post’s URL. If you need to shorten the slug, do that here. Be sure to separate all words with dashes and do not use any other punctuation.
- Date: change the publish date, if necessary. You can use this to post-date an entry so it will be published in the future.
- Author: the author of the post. You can change this to other authors on your WordPress site if you are an administrator and posting articles on their behalf.
- Password: password protect posts if you want to restrict access.
- Categories: main categories that you’ve established for your content
- Tags: tags that you’ve assigned to a specific post
- Comments/Pings: turn this interactivity on or off
- Status: toggle between published, pending review and draft statuses, depending on whether you’d like for your post to be publicly accessible.
- Sticky: if you make a post sticky, it will show up at the top of its archival pages
This is information you can also access under the full “Edit” option. Most often you will enter this information when you initially add the post.
Create a new post
Go to Posts > Add New Post in the side menu to add a new post.
When you create a post, the main things you need to always enter are a title and your post content. The list below is a brief overview of the modules you see when you create a new post or edit an existing post.
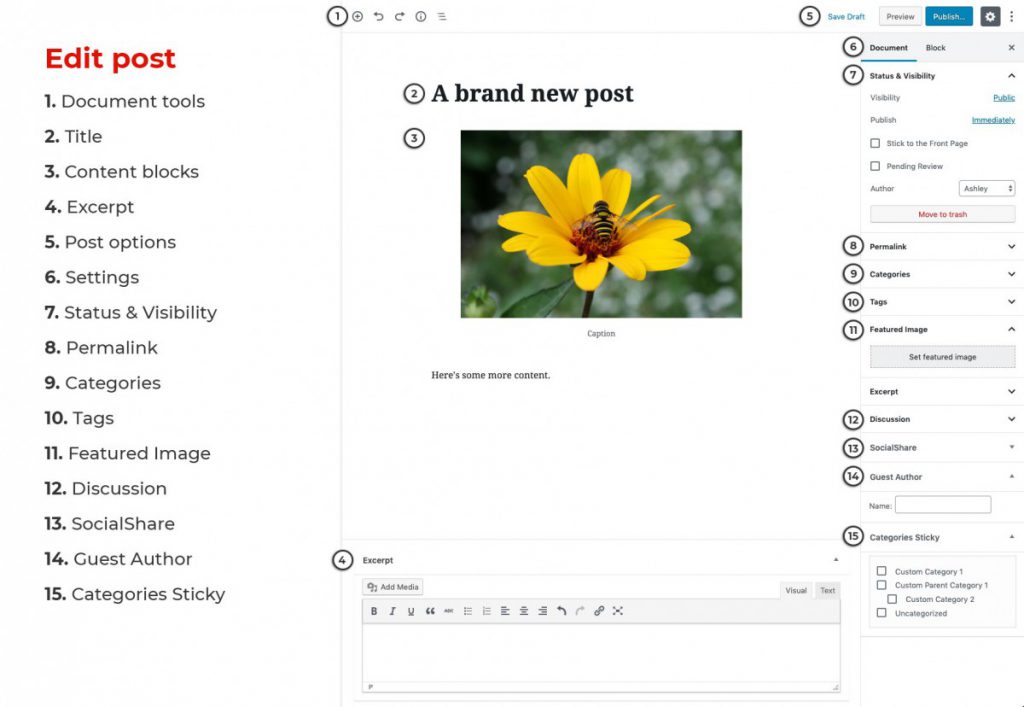
- Document tools for Add Block, Undo/Redo, Content Structure and Block Navigator:
- Use the Add Block button to choose and insert content blocks to the body of the post.
- Undo/Redo edits to the post.
- Content Structure provides a word count, amount of headings, paragraphs, and blocks on your post, as well as an outline of the post structure.
- Use the block navigator to quickly navigate to blocks within the post.
- Title: your post’s title.
- Content Blocks: the body of your post, made up of individual blocks of content. You can start by simply typing in the default paragraph block, or use the Add Block button to choose and add blocks of content to the post.
- Learn more about using the WordPress editor.
- Learn how to link to other posts and Web pages.
- Learn how to clean up content from Word documents.
- Excerpt: the excerpt is a short synopsis of the post. If you enter content here, it will show up on any page where this post is listed. Do not add media to the excerpt area if you plan to use Featured Image.
- Save Draft/Switch to Draft, Preview, Publish/Update, and Settings:
- for brand new posts, use Save Draft to save your draft before publishing. This option becomes Switch to Draft once the post is published, and will switch the post back to an unpublished draft.
- use Preview to see what your post looks like before publishing or updating.
- use Publish/Update to publish your post, or update if already published.
- the gear icon Settings button toggles open and close the Settings menu to the right.
- Settings: the settings menu has options for both the overall post under the Document tab. When editing an individual block, options for that block will appear under the Block tab.
- Status & Visibility: choose options to change the post’s status, visibility, and published state. You can pre-date a post to publish in the future under these options. See Schedule a post.
- Permalink: after you save your post, this is a direct link to the post; you can change the last part of this link if you want to shorten it.
- Categories: use categories to organize your posts into primary sections; see Categories and Tags for more information.
- Tags: use tags to associate specific terms with a post; see Categories and tags for more information.
- Featured Image: the featured image is included to the left of the excerpt on any page where the post is listed. Learn more about editing the featured image, see Working with images and videos.
- Discussion: options for allowing comments, pingbacks, and trackbacks.
- SocialShare: option to remove the SocialShare options on a post. If checked, this option would remove the social media share buttons from the top of a post.
- Guest Author: type in the name of the author of the post, if they do not have an account for your site.
- Categories Sticky: use this when you want to have the post stick to the top of a specific category page.
Categories and tags
Use categories and tags to help organize your posts. When you label your posts with these, it helps your audience focus on a specific topic. You can also use these to help group important content together for your header navigation.
Categories
It is good to think of categories as very large topic areas that are relevant to your posts. You can also use categories to organize kinds of posts, like “news” vs. “events” vs. “feature article.”
Note: Extension WordPress site authors are encouraged to use categories that correspond to the topics at extension.uga.edu. It is possible that the Extension website may pull in articles from WordPress sites using corresponding categories and tags.
Tags
Tags are often used to indicate more specific information relevant to a post. For instance, if you had a post categorized as a recipe, tags on the article might include major ingredients or other identifiers.
Pages overview
If you click on the Pages link in your menu, you will get a general listing of all the pages in your WordPress site. This page lists the title, author, comment numbers and publish date and status for all the pages on your WordPress site. Depending on your user role, you may only be able to edit your own pages and not those of others on the same WordPress site.
Finding a page
You can use the tools at the top of the page to narrow the list by searching for a certain page, or you can filter pages by date. If you want to see all the pages by a particular author, just click on their name in the Author column.
Editing basic page information
Click on “Quick Edit” under any page to edit basic information about the page. You can use this option to quickly credit a different author for a page, change a page’s status, change the page template, and turn comments off and on. You can also edit things like the title, slug, publish date, and it’s relationship to other pages.
- Title: make quick changes to your page’s title.
- Slug: this is typically the last section of the page’s URL. If you need to shorten the slug, do that here. Be sure to separate all words with dashes and do not use any other punctuation.
- Date: change the publish date, if necessary. You can use this to post-date an entry so it will be published in the future.
- Author: the author of the page. You can change this to other authors on your WordPress site if you are an administrator and posting pages on their behalf.
- Password: password protect a page if necessary.
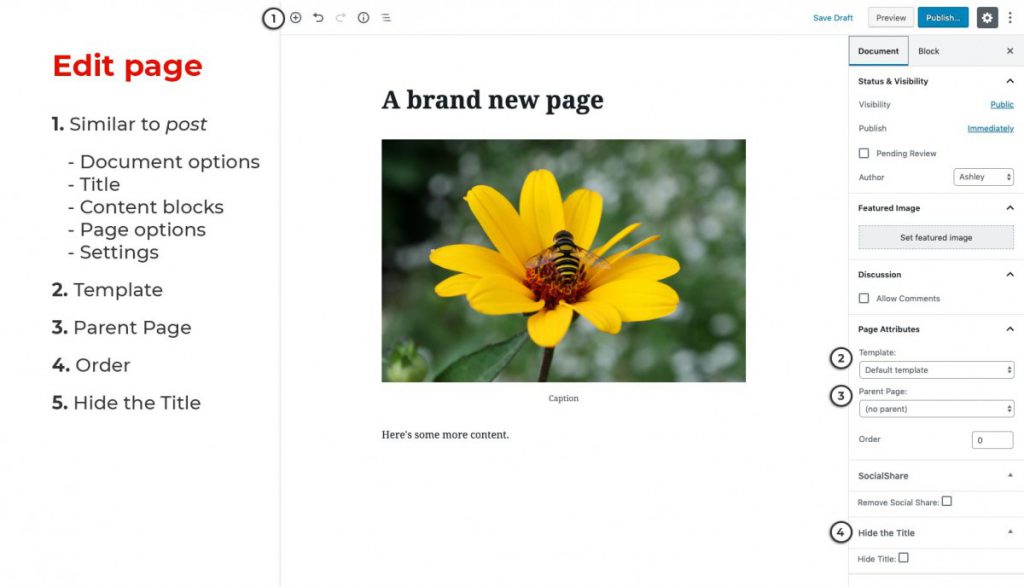
- Parent: assign a parent page, if needed. If you are creating a navigation for your pages, this helps WordPress know if this page belongs under a particular section.
- Order: if the page has a parent. order helps distinguish where it falls with sibling pages. The default order is alphabetical to the page title.
- Template: pages can use different templates to display particular information. Unless you are making a special page, use the default template.
- Comments/Pings: turn this interactivity on or off
- Status: toggle between published, pending review and draft statuses, depending on whether you’d like for your page to be publicly accessible.
This is information you can also access under the full “Edit” option. Most often you will enter this information when you initially add the page.
Create a new page
Go to Pages > Add New in the side menu to add a new page. Adding and editing a page is almost exactly like working with a post. You will add content, link to resources, add images and other sorts of things in the same way.
The biggest differences are:
- Pages cannot have tags and categories assigned to them
- Pages can be nested under other pages
- Pages can have different page templates applied to them
Page templates
Pages have specific templates that can be applied to them. For the most part, you should always use the “Default Template.” Depending on the capabilities of your WordPress theme, you may have other custom page templates assigned.
Make a Contributors page
If you would like to include a list of all of the authors for your WordPress site, choose “Contributors” as your template from the Page Attributes module. This will automatically pull the biographical information, photo, name and number of posts for each author in your WordPress site.
Adding sub-pages/page order
If you have many pages in your WordPress site, you may find that you want to categorize them under common sections. An example for this could be an “About Us” page that has a “Contact Us” and a “Contributors” page underneath it.
In order to create a relationship between pages, first create your “About Us” page. Then, when you create your next pages, you can select “About Us” as the parent for your page under the Page Attributes module.
When you have multiple pages nested together, the default order of display is alphabetical by title. If you would like to change the order of the sub-pages, simply edit the Order value under Page Attributes.
Hide the title
This option will hide the page title if checked. You may want to use this option if your page:
- uses a template without a sidebar, AND
- the top of the page uses a special Cover block as the title
Deleting posts and pages
Posts and pages can be deleted from both the quick edit and full edit mode. Moving a file to the trash will effectively remove that resource from your list of posts and pages. You can restore resources that have been moved to the trash within 30 days of their original trashing – provided that the trash has not been emptied on your WordPress site.
Moderate comments
If you have comments enabled for your posts and pages, you should monitor what is being said on your WordPress site and respond appropriately. In most cases, it is recommended that your WordPress site be set to only allow comments that have been approved by you, the moderator.
Reviewing comments
You can see all the comments made on all of your content by clicking on the comments option under the publishing tools menu. This shows all of the comments with author information, comment text, referenced post/resource, and an action menu for you to approve, reply, edit, flag as spam, or trash the comment.
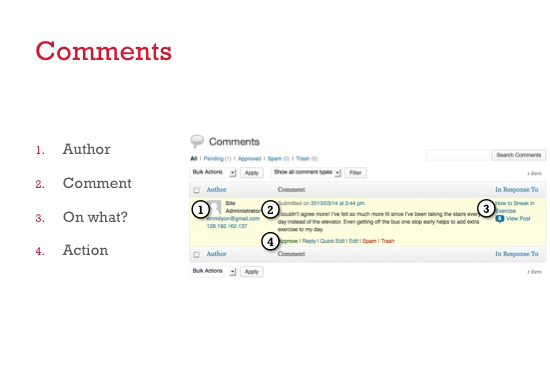
Finding comments for a page or post
On the screens that list all of your pages and posts, you will see a column called “comments.” If your page or post has comments on it, this will display the number of comments – regardless of whether the comments have been published or not. Click on this number to see the comments for that page or post.