If you’re interested in adding a slideshow to your CAES or Extension WordPress site (like the one below), then you’re in the right place! This article will guide you on how to use the Gutenslider plugin for slideshows.


The “guten” in the name refers to WordPress’s block editor, also known as Gutenberg. Gutenslider’s best feature over other slideshow plugins is that it lets you use other Gutenberg blocks inside of each slide. This allows for easier formatting of slide content. You can have a slideshow as simple as rotating images, or you can make a slideshow with images, text, buttons, and so on.
This article will cover:
- How do I add a Gutenslider slideshow to my site?
- Adding and editing slides
- Rearranging slides
- Gutenslider settings
- Individual Gutenslide settings
How do I add a Gutenslider slideshow to my site?
- Contact the OIT Web Team at caesweb@uga.edu and let us know you want to add a slideshow to your WordPress site. We will add the Gutenslider plugin to your site.
- Log in to your WordPress site.
- Go to a page or post you want to have a slideshow on. Click “Edit Page” or “Edit Post” from the top bar.
- Add a Gutenslider block to the page. Use the “Add Block” blue plus sign in the top left of the edit screen, or use the black plus sign in the content area. Search for “Gutenslider” and select it to add.
- There are two choices from the Gutenslider options. Select one:
- Use a background image on the slides, or
- Add a blank slide without a background image
If you choose to use background images, you can select multiple images from the gallery for multiple slides. If you choose to start with a blank slide, you will jump straight to adding content to your slides.

Accessibility Note
Make sure that any content you put on top of your image background can be easily read, with enough contrast between the text and background. Read more about color contrast in our Accessibility Tips for WordPress Content Managers article.
Adding and editing slides
The block editor’s List View lets you view the blocks on your page as an outline.
It makes your life easier to use List View when editing Gutenslider. Since the slides aren’t all visible at once, List View lets you select and then edit even “invisible” slides.
Here’s how to make various changes using the List View to navigate. See the image below for reference.
- Reveal the List View left sidebar by clicking the icon in the upper lefthand corner.
- Click Gutenslider from the List View. This will reveal the settings for the block on the right sidebar. We’ll talk more about these settings in the next section. Expand Gutenslider to reveal each Gutenslide in your slideshow.
- Click an individual Gutenslide block to reveal the slide in the editor. You can edit the content directly in each slide. This also reveals the settings for each individual slide in the right sidebar.
- Add content to your slides. You can add other types of blocks here, including images, paragraphs, buttons, and so on.
- To add an empty slide, first click Gutenslider in the List View. Then click the blue “Add Empty Slide” button below the slideshow.

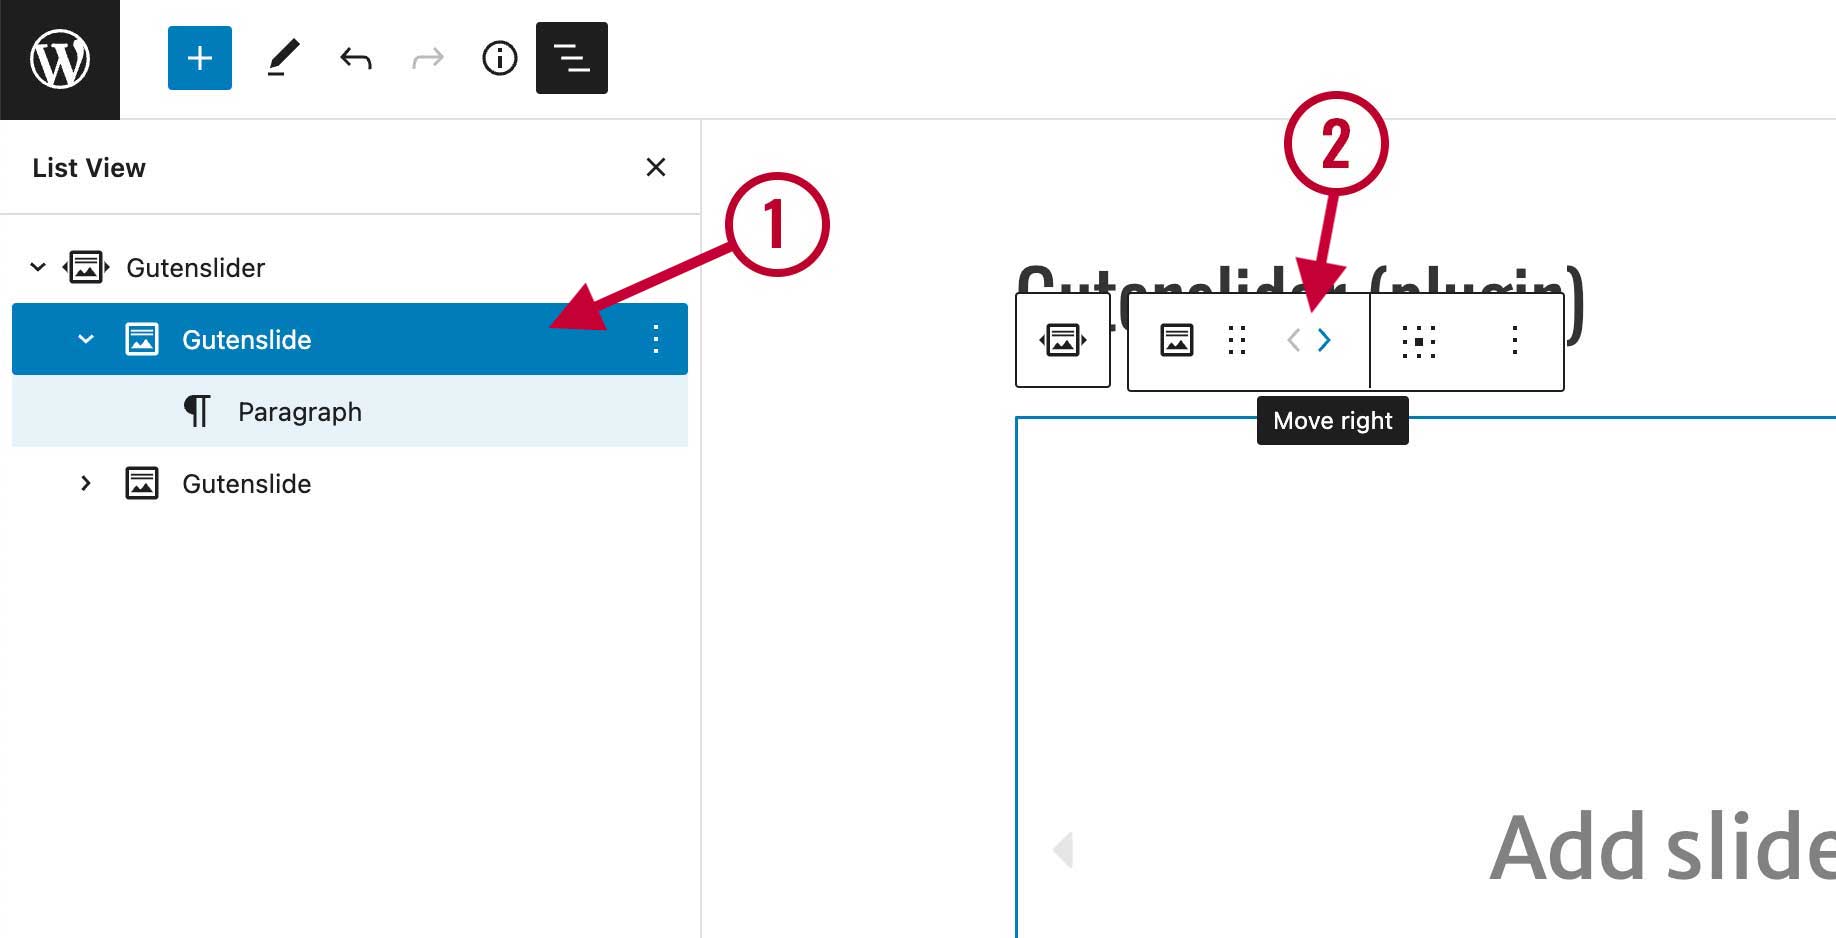
Rearranging slides
To rearrange the order of slides:
- In the List View, click the Gutenslide you want to move.
- From the toolbar above the slide, use the “Move left” and “Move right” options to rearrange the slide as needed.
Gutenslider settings
Gutenslider settings apply to the whole slideshow. To access these settings, click on “Gutenslider” in the List View, and click on the “Block” tab in the right sidebar.
The Gutenslider block has a ton of settings! Explore what’s available. Here are some options we think you should keep in mind:
General Settings
- Animation: Choose the transition between slides: slide, fade, or flip
- Slider height: All slides have the height you set with “Minimum Slide Height“, unless the content is higher. Use this option so the content beneath the slider doesn’t get pushed down when slides changes!
- Show arrows, Show dots, and Keyboard navigation: Keep all of these options on to make your slider easier to navigate and accessible.
Autoplay Settings
- Pause on hover: Keep this option on to make your slider easier to navigate and accessible.
Arrows Settings and Progress Settings
You can optionally change the appearance of the navigation arrows and progress dots. You can change each’s size and color. Make sure you choose colors for these that will contrast well against your slide backgrounds! For example, if your slides use a dark background, use white navigation arrows and progress dots so it’s easy to see them.
Individual Gutenslide settings
Gutenslide settings apply to an individual slide. To access these settings, click on the “Gutenslide” in the List View that you want to edit, and then click on the “Block” tab in the right sidebar.
Background Settings
- Background type: Set the individual slide to use no background, background color, or background image. For images, you can center your image on a different focal point.
Slide Settings
- Slide Link: Paste in a web address that the slide will link once clicked.
- Automatic Captions: Use the different options to automatically pull the image’s title, caption, and description into the slide. Edit image metadata in the media gallery.
Need help?
If you need assistance with your slideshow, please contact the OIT Web Team at caesweb@uga.edu.