Have you ever needed to capture a picture of a window on your computer, or get a copy of a picture on the web that isn’t available for download, but you thought you didn’t have any software to do it? Well, you actually do have the software, and it’s available in Windows 7 and Windows 8.1, and it’s called “Snipping Tool.”
Where to find the “Snipping Tool” in Windows 7
You can find the Snipping Tool in a couple ways. You can go to the ‘Start Menu’, and then select ‘Accessories’, then select ‘Snipping Tool.’ Or, in the Start Menu search box, type ‘snipping tool’ and it will bring the software to the list and then click to start the software. It will start as though you are taking a ‘snippit’ of your current window, so your screen will turn a faded shade. If you are not ready to ‘snip’, hit your ‘Esc’ key to return to the ‘Snipping Tool’ opening window.
Note: If you use this software a lot, you should ‘pin’ the icon to your Taskbar or Start Menu. To do this, right-click the icon and select where you want to the pin it.
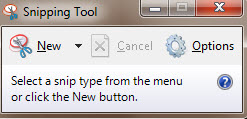
Snipping Tool opening window
From the opening window you can start a New ‘snip’; Cancel a current snip, or change your Options.
There are four types of snips available when pressing the New button:
- The Free-form Snip enables you to draw an irregular line around an object or area.
- The Rectangular Snip allows you to take a screenshot shaped as a rectangle, by dragging the cursor around an object.
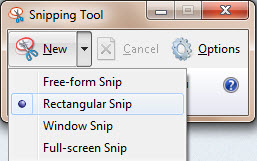
Methods of Snipping - Window Snip allows you to select a window (e.g. your Internet browser) or dialogue box (e.g. error message received from an application) and capture it.
- Full-screen Snip enables you to capture the entire screen, like the old-fashioned Print Screen key.
Snipping Tool Options
Options from the menu is divided into two sections: Application and Selection
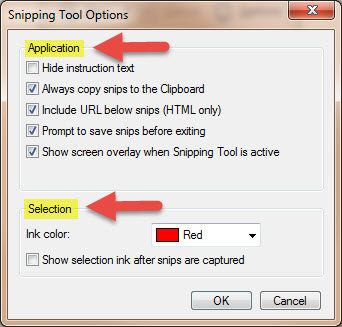
The Application section has a set of checkboxes that enable you to make the following changes:
- Hide Instruction Text – hide the instruction text in the main Snipping Tool window.
- Always copy snips to the Clipboard – copy all captures to the Windows clipboard so you can paste them into other applications (e.g. Word processors or image editors).
- Include URL below snips (HTML only) – save your snips as a Single File HTML or MHT documents. If a snip is taken from an Internet Explorer window, it also shows the URL of the webpage included in the screenshot.
- Prompt to save snips before exiting – gives you a heads up if you have any captures that you have not saved, prior to closing the program.
- Show screen overlay – if disabled, when you are taking a screenshot, the Snipping Tool transparent overlay is no longer shown on the screen.
The Selection options allow you to change a few settings related to the color palette:
- Ink Color– changes the color of the selection border when you create a snip.
- Show selection ink after snips are captured– when enabled, the selection border is shown around the snip, using the color selected in the‘Ink Color’
Taking a ‘Snip’

When you first open Snipping Tool it defaults to taking a snip, so if you’re not ready to snip, hit your Esc key. When you are ready to take a snip click the down arrow on the New button and select the type of snip you want to take. This example is using the Rectangular Snip option.
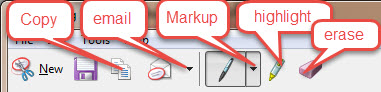
Once you click New your screen will look as if it has a grey filter over it and your cursor will turn into a crosshair (big plus sign). Move your cursor to the image you want to take a snip of and hold down your left mouse button and draw around the area you want to snip. When you release the mouse button, the snipping tool editing window will appear. The editor allows you to edit and annotate the snip.
Once you’ve taken your snip and done any annotations, you can save it by clicking the ‘Save Snip’ button on the toolbar, the one that looks like a floppy disk. At the ‘Save As’ dialog box, navigate to the location you want to save the file; enter a name for the file, and select what type of file you want to save it as under ‘Save as type’. Your options are JPEG, PNG, GIF, or HTML.
Hope this proves helpful and you can easily ‘get the picture.’