In my last blog I wrote on how to avoid malware. I wanted to follow that up with a guide on how to remove malware. This guide contains a lot of information, maybe more information than you would need. To help you, I have broken malware removal down into four levels of care. Each level contains tips and tricks that I use for malware removal every day. Each level takes more time and more skill, but as you go up you have a better chance of completely removing malware. I have included a flow chart with each level to help guide you in your removal process. Each flowchart has the corresponding sections in each step of the chart if you need to refer back to the guide.
If you have or suspect you have an infection on a college owned device, please contact the CAES OIT Service Desk at 706-542-2139 or at oithelp@uga.edu. This is a guide for education or removal of malware from personal devices.
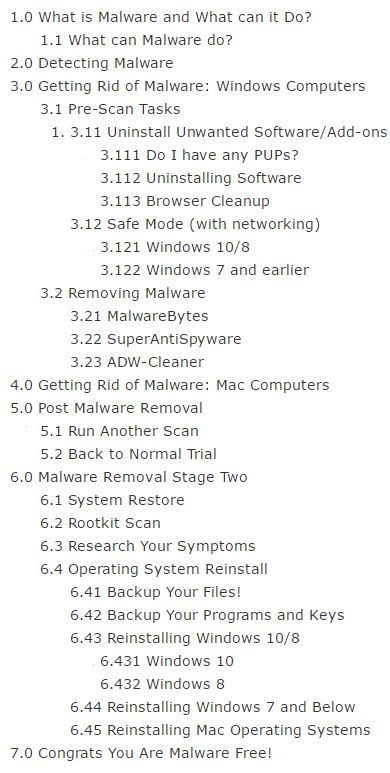
Level One
This is your most basic level of care. This essentially is one quick scan. While it is the fastest it is the least effective.
Amount of time: About 1 hour
Sections used: 2.0, 3.2, 3.21, 5.2 and 7.0
Software needed: MalwareBytes
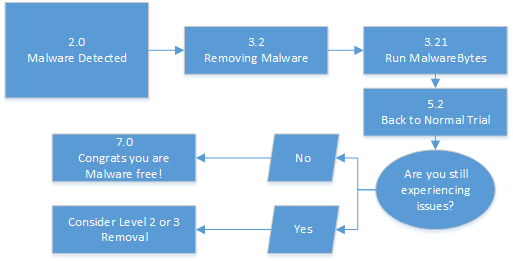
Level Two
This is your standard level of care. This involves my recommended cocktail of scanners as well as some computer cleanup. This should rid your computer of most malware.
Amount of time: 2-3 hours
Sections used: 2.0, 3.1, 3.111, 3.112, 3.113, 3.2, 3.21, 3.22, 3.23, 5.2, 7.0
Software needed: Revo Uninstaller, MalwareBytes, SuperAntiSpyware, and ADW-Cleaner
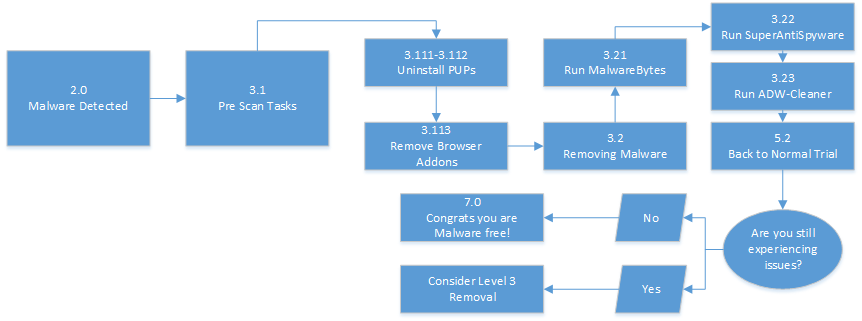
Level Three
This is your highest level of care you can give a malware infection. I only recommend this level of care if you have a severely infected computer or if you want to be completely confident you malware is gone.
Amount of time: All day and maybe some of the next
Sections used: The whole guide
Software needed: Revo Uninstaller, MalwareBytes, SuperAntiSpyware, and ADW-Cleaner
Level Mac
Macs fall under their own umbrella since malware removal on Macs is a process in development.
Amount of time: All day (Mac scanners take a very long time to run)
Sections used: 2.0, 4.0, 6.0, 6.4, 6.41, 6.42, 6.45, 7.0

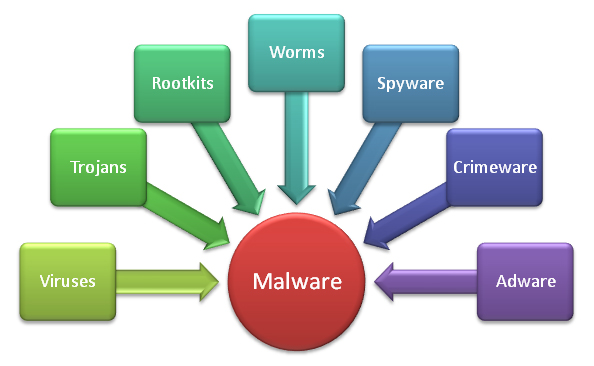
1.0 What is Malware and What can it Do?
Malware is the broad term used to describe any harmful elements on your computer. Viruses, adware, spyware, rootkits, trojans, and worms are all considered malware. There are good chances that there is malware on your computer now, as many forms of malware are quiet. So, why remove malware? Malware can be harmful to you and your PC in many ways.
Malware can do the following:
- Hinder PC Performance
- Malware can slow down your computer by using your computers resources for its own needs. Some malware is designed to overload your computer with tasks which in return makes your computer impossible to use.
- Advertisement
- Malware can be used to insert ads into your computer. While this isn’t particularly harmful, it is annoying and these ads are often an indicator of more serious underlying infections.
- Steal Private Data
- The ways in which malware steals your data varies in methods. Spyware is designed to lay quiet and steal sensitive info such as passwords or banking information.
- Invite More Malware
- A computer with a malware infection rarely only has one infection. Malware comes in packages and often lead the way for even more malware to infect your computer too. Trojans are a type of malware designed to do this, hence why they are named after the Trojan Horse.
- Create Backdoors
- Malware is programmed to carry out its task automatically, but some malware can create a backdoor in a computer. This is a backdoor for a hacker to remote into your computer and carry out whatever tasks they want.
- System Hijack
- Malware can hijack your computer to use its resources for its own purposes. A common hijack is a botnet hijack. A botnet consist of many, many computers who all have the same infection. This infection allows a hacker with access to that botnet to call on the resources of all computers infected to carry out a task together. There are botnets that consists of millions of computers, together these botnets can be used to carry out large attacks. Within the last year botnet attacks have been used to bring down internet services all across the United States. Your computer may be a part of cyber-terroristic attacks and you don’t even know.
- Ransomware
- If system hijacking wasn’t enough to get you scared, there’s ransomware. Ransomware is malware designed to infect and scan your computer’s files. Ransomware finds files that are of value to you and locks them up. These are your pictures, your documents, and any thing you have saved on your computer that you value. In addition to what is on your local hard drives, ransomware goes through any shared drives, external drives, and flash drives connected to your computer. Once locked up, ransomware demands a ransom for your files. Ransoms can be anywhere between $500-$1000+ and some even come with programming to calculate the value of your data to try to get the most of out you as possible. The best way to combat ransomware is having a good backup system, what defines a good backup system changes as ransomware itself changes. If you do get ransomware on a personal device, paying the ransom is an option. However if you do decide to pay the ransom, be extremely cautious as you have no guarantee that you will receive the key to unlock your files. You cannot unlock your files without paying the ransom. If you don’t have backups or will not pay the ransom, your files are gone. If you receive ransomware on a college owned device, please contact the Service Desk. I will cover ransomware and protection against it in a future blog.

2.0 Detecting Malware
Malware infections can be difficult to spot, as malware can be lying quietly. Over the years I have developed a good eye for malware infections and here are some tips on spotting malware indicators.
Adware
Adware is one of the easiest ways to spot a malware infection, because of its nature adware is a bit obvious and in your face. Adware creates ads on your computer through many different means. Some obvious indicators of adware are home page changes, tool bars you didn’t ask to be installed, change in search engine, ads on your desktop/ads outside of your browser, programs installed on your computer you don’t remember installing (aka PUPs), and increased obnoxious ads in your browser. If you computer has any of these indicators, it likely has adware and other infections beneath that.

Performance Issues
Performance issues are tricky because faulty hardware and general overloading of the computer can cause performance issues just as often as malware can. For the common computer user, it is not likely they know what the specifications of their computer is and what load those specifications can handle. If you notice a sharp decline in your computer’s performance, it may be an indicator of malware. If this is a college owned device, call the Service Desk and we can take a look at the computer to diagnose why it is running slower. I will be doing a blog on slow computers, so stay tuned for that.
General Oddities
Malware infections can cause your computer to do strange things. If you notice your computer doing strange things with no explanation, the explanation could likely be malware. These are things such as startup issues, blue screens, and programs suddenly not working correctly.
Notification
You may receive a notification from your active protection software, whether that is Windows Defender or Trend Micro. Most of the time, these notifications are notifying you of a single threat removal. More threats could be present, further action is recommended.
3.0 Getting Rid of Malware: Windows Computers
I’ve got malware! Now what? The next few sections will be tips on how to effectively rid your system of malware
3.1 Pre-Scan Tasks
For our level 2 and 3 care you will want to carry out some tasks before you start your scanners. These will help maximize your scanners’ effectiveness.
3.11 Uninstall Unwanted Software/Add-ons
Malware often times comes from software unknowingly installed. These are classified as PUPs or potentially unwanted software. Examples of this would be CouponPrinter or OptimizerPro. This is a list of several common PUPs. Before you run scans, you should remove these programs. Not all scanners will pick these up so its best to do this yourself. You will want to do this outside of safe mode, since many uninstallers do no run in safe mode.
3.111 Do I have any PUPs?
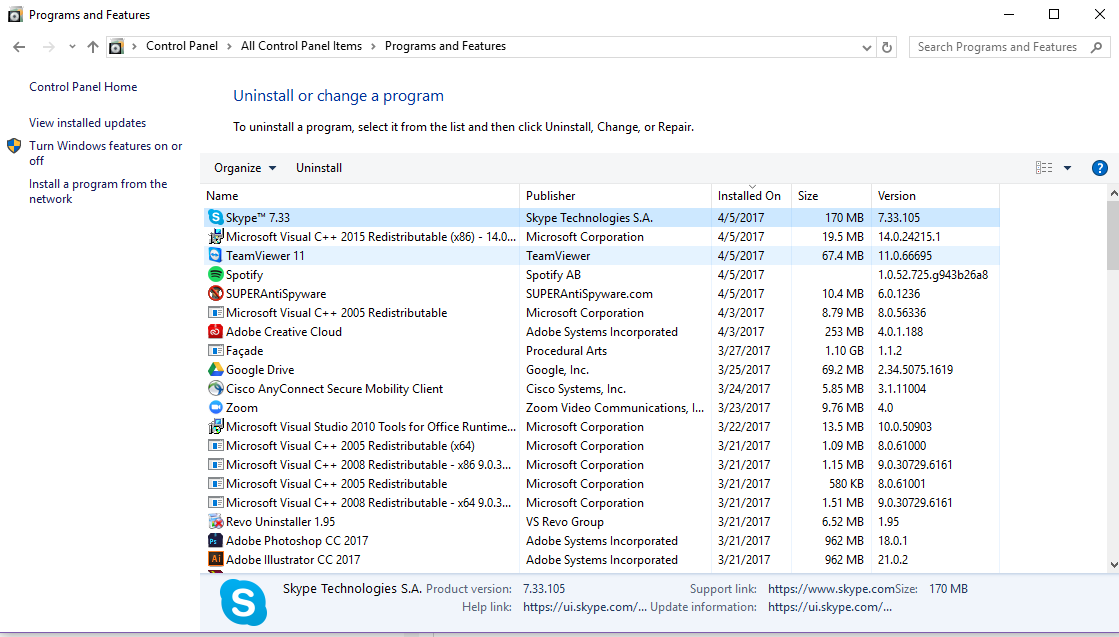
First you want to get an overview of what software you have on your computer.
- To do this open up Control Panel and find the ‘Uninstall programs’ or ‘Programs and Features’ option.
- This will open a window showing all the programs Windows has registered as installed. Once all loaded, sort by date.
- Search through these programs and get an idea of which ones you’d like to remove.
- Remember these are things you didn’t want to install. So if you see something you don’t remember installing, add it to your list of software to uninstall.
- If you are unsure if a software is unwanted or not, put the name of the software into a search engine and see what kind of results you get.
- If you have multiple users on the computer, you may want to consult with them on removal of software.
- Towards the bottom (or earliest dates installed) you will likely see a bunch of software that came with your computer. These are generally harmless, but if you want to remove them, you can. Just be cautious not to remove software that your computer depends on such as Realtek drivers for your speakers or Alps Pointing software for your trackpad.
- Keep this window open it will be a reference if you have multiple software to uninstall.
3.112 Uninstalling PUPs
To uninstall software, I use a program called Revo Uninstaller. When you uninstall a program, it usually leaves behind different elements. Revo finds those elements and deletes them too. When dealing with PUPs, you will want to remove every bit of the software.
- Open Revo and find the programs you have on your list to uninstall. Select one of those programs and select the uninstall button.
- This will open a window as well as the uninstaller for that specific program. Do whatever the uninstaller prompts to get the program to uninstall. Once complete you will see a next option on the Revo window. Select ‘next’.
- This will begin searching your computer for leftover elements. Make sure to select all the check boxes on whatever it finds and delete those.
- Repeat this for each software you want to uninstall.
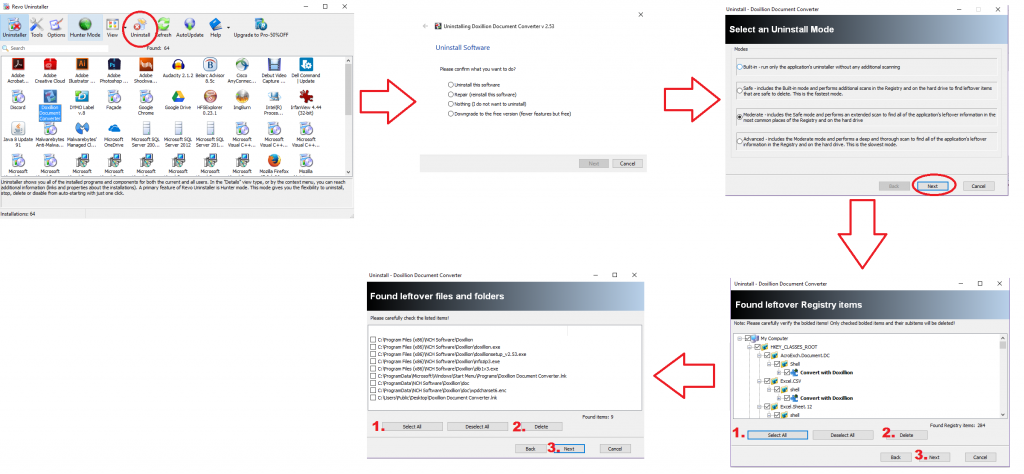
Please note: Each program will run its own installer, so everyone’s second step will look different.
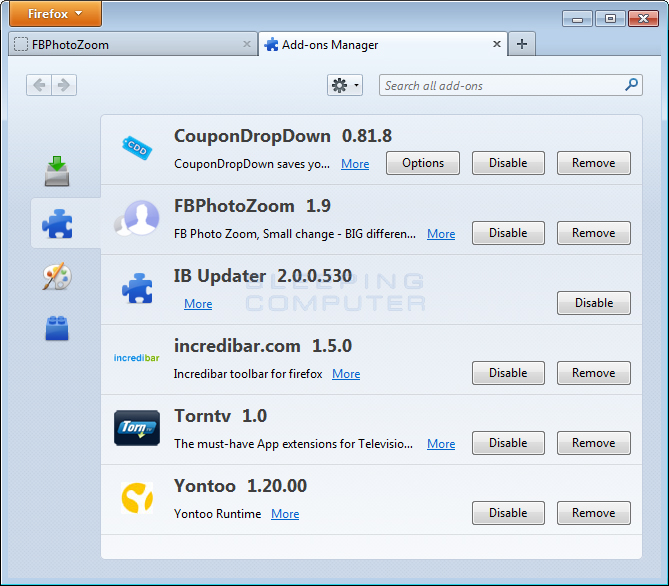
Browser Cleanup
Malware will often install add-ons or toolbars to your web browsers. Scanners often don’t remove these, but removing them manually makes sure you remove them regardless of what your scanner does. Below is where you can find your browsers add-ons.
- Chrome
- type ‘chrome://extensions’ into the address bar and hit enter.
- Select the trash can icon adjacent to the extensions you’d like to remove to delete.

- Firefox
- type ‘about:addons’ into the address bar and hit enter.
- On the left hand side select ‘Extensions’.
- For any add-ons you wish to remove, select the remove button adjacent to the add-on.
- Also look at the Services and Plugins too and see if there are any add-ons that you’d like to remove.
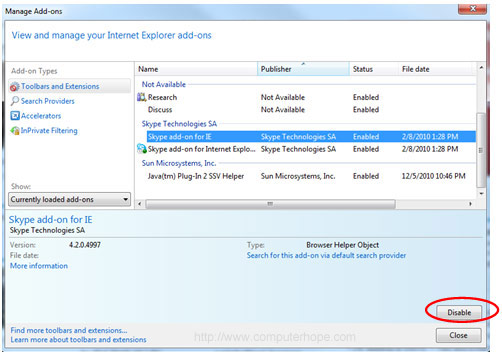
- Internet Explorer
- Open your settings drop down menu by selecting the gear icon in the top right corner.
- Within that menu select ‘Manage-Add-ons’.
- Right click and disable any unwanted add-ons
- Edge
- Select the three dots icon in the top right hand corner. In that drop down menu select ‘extensions’.
- In the extensions menu select the add-on you want to remove.
- This opens a window with options for that add-on, select ‘uninstall’ to remove.
3.12 Safe Mode (with Networking)
One of the most beneficial things you can do in your process of removing malware is to get your computer into safe mode with networking. Safe mode is a mode built into Windows that lets you run Windows at its most basic state. This means there are no non-essential programs or services running. These non-essential programs/services are usually what malware uses to run on your computer. Safe mode essentially lets you run your computer without malware interference. I choose to use the ‘with networking’ option because this allows you to download more anti-malware software or to run updates on anti-malware software. Here is how to get your computer into safe mode.
Windows 8/10
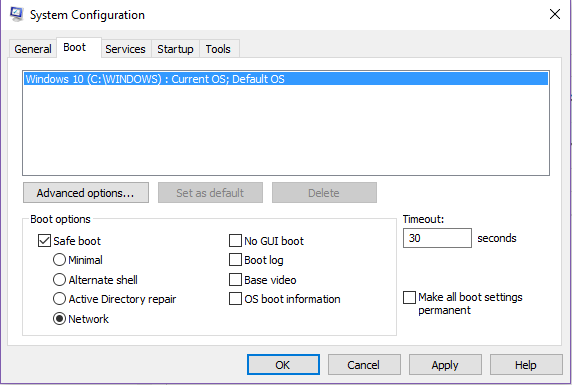
- Select your Windows key on your keyboard to open the search menu/bar and type “msconfig.msc” and hit enter.
- This will bring up a window and in that window select boot.
- On the bottom of the boot window, under boot options select Safe boot and also tick the network option underneath that.
- Select Ok. This will bring up a box asking to restart.
- If you are ready to restart, hit restart
- If you are not ready to restart, select exit without restarting.
- When you do restart, Windows should now boot into safe mode with networking.
- Do note that safe mode is a bare basics mode. Things may look different and feel different, but you should be able to get to most tools you need to get the job done.
- Once the job is complete, go back to the ‘msconfig.msc’ and uncheck the safe boot option.
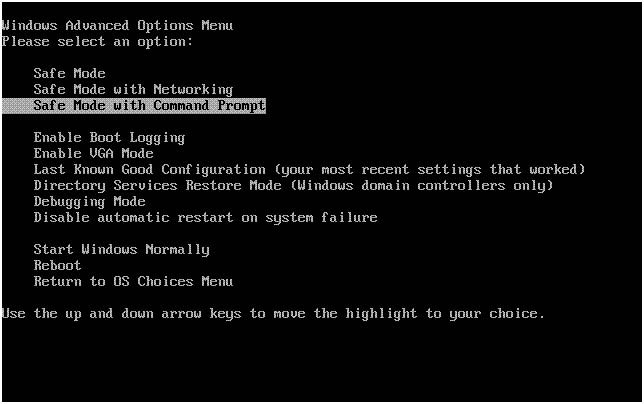
Windows 7 and earlier
- Restart your computer
- Hit F8 repeatedly until you see the screen pictured below.
- If you get a different screen, restart again and you may have to wait until after the logo of your computers make appears. If it is a Dell you may have to wait until the Dell logo is on.
- Select Safe Mode with networking.
- This will boot the computer into Safe Mode.
- Do note that safe mode is a bare basics mode. Things may look different and feel different, but you should be able to get to most tools you need to get the job done.
- You will have to repeat these steps anytime you reboot and you want safe mode again.
3.2 Removing Malware
Removing malware is best done by scanner, and better yet, a series of scanners. Malware scanners will scan your system and detect malware on your computer, once the scan is done, it will remove/quarantine the malware. There are a multitude of scanners available and scanners are most often free to use. Each scanner has its own strengths and weaknesses. If there was one perfect scanner or anti-malware protection, we wouldn’t have to worry about malware. Since that perfect product doesn’t exist, we cover our bases with multiple software. For this guide, we will use my three prong attack. The scanners used will be MalwareBytes, SuperAntiSpyware, and ADW-Cleaner. These are all free scanners.
Please note these scanners are most effective in safe mode!
MalwareBytes
MalwareBytes, in my opinion, is the best scanner available. I often detect more threats with MalwareBytes than any other scanner. If you only have time for one scanner, use MalwareBytes. Here is how to use MalwareBytes.
- Download and install MalwareBytes.
- You may be prompted to install the latest updates. If so, install the latest updates.
- Open MalwareBytes and select the big ‘Scan’ button.
- This will automatically grab the latest updates from MalwareBytes.
- Let the scan run, it may take 45 min-2 hours depending on hard drive size.
- Once complete you will get a list of all threats found. Select all of the threats and remove.
- Some threats will automatically be unchecked. Check them off, you will want to remove those too.
- MalwareBytes will remove all threats found and will need to do a restart. Perform the restart.
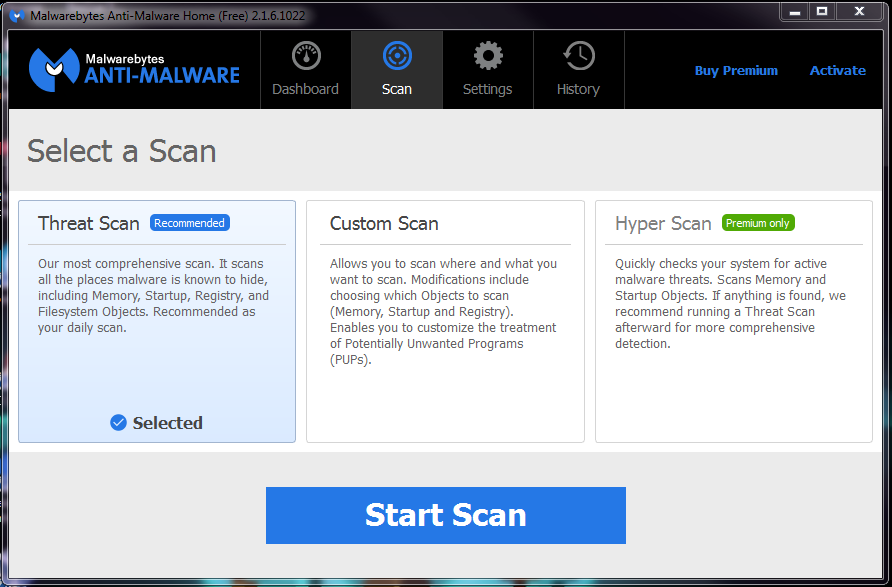
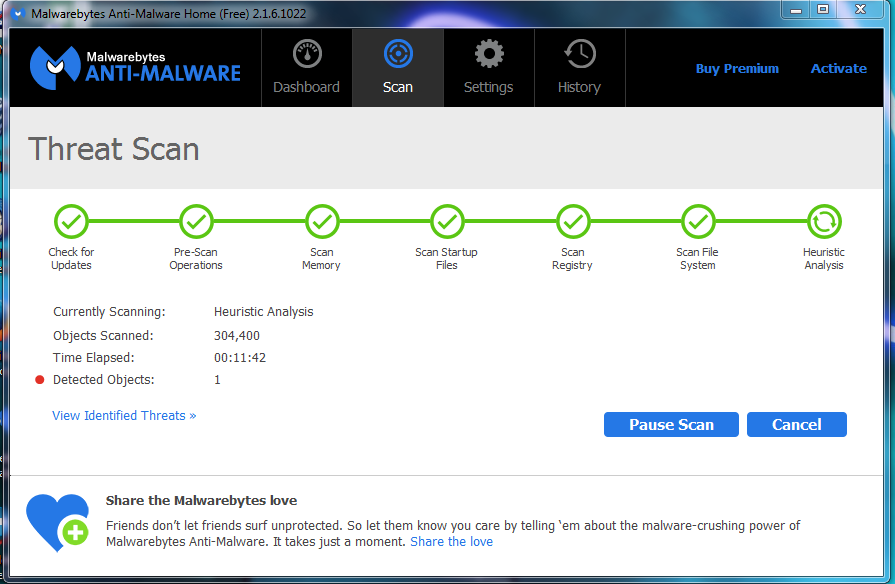
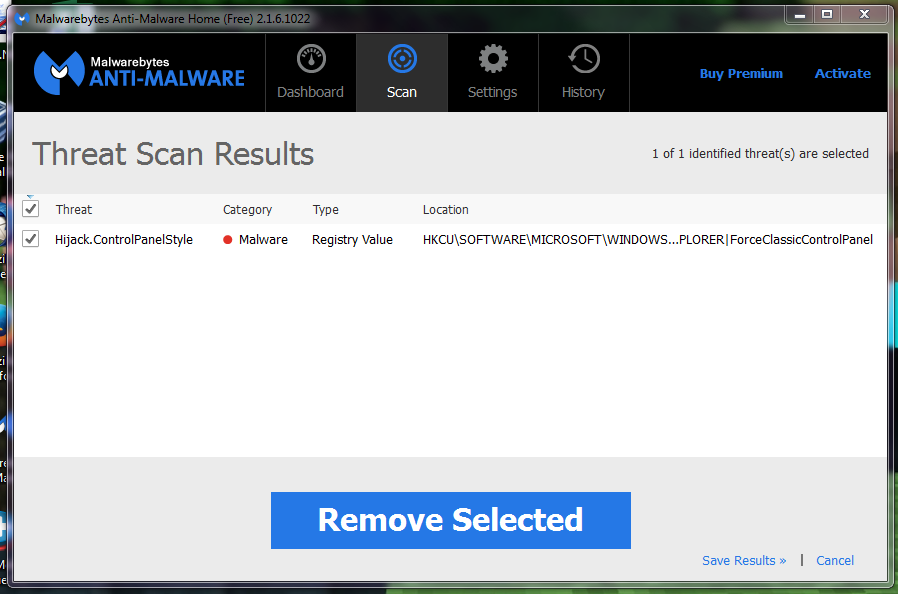
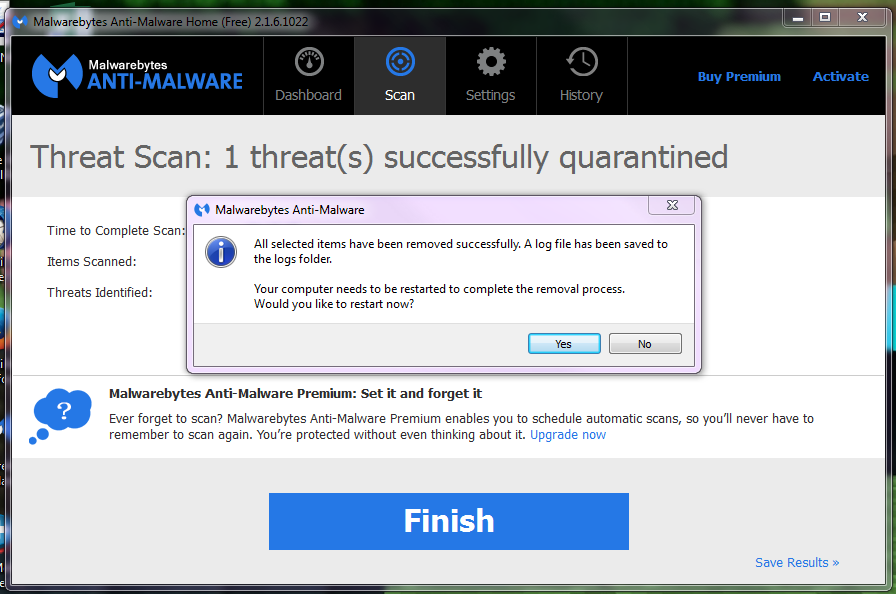
The pictures above should give you a visual aid on how the scan process for MalwareBytes goes.
SuperAntiSpyware
- Download and install SuperAntiSpyware.
- Open SuperAntiSpyware.
- If asked about a trial, deny it.
- If it needs to run updates, let it do so.
- Select ‘Scan this Computer’
- Under Scanner options you want to switch it to ‘High Boost’.
- If you are trying to scan and use your computer at the same time, you can keep it at low boost.
- Select ‘Complete Scan’ to start the scan. This can take from 45 min to 2 hours depending on hard drive size.
- If you are in more of a hurry Quick Scan is a good option as well as a Critical Point Scan.
- Before the scan officially starts you may get a window with some programs listed on it, SuperAntiSpyware has a tool build in to remove unwanted software. If you get this list, remove any software on the list by select the red X icon.
- As the scan runs you will notice a lot of Adware Tracking cookies. Don’t be alarmed by the amount found, any computer with internet access will have a ton of these and they are relatively harmless.
- Once complete, remove all threats found. If prompted to do a restart, do so.


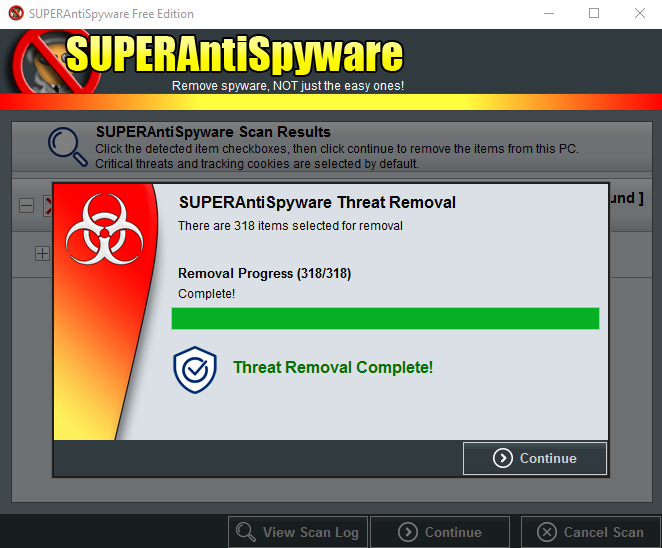
The pictures above should give you a visual aid on how the scan process for SuperAntiSpyware goes.
ADW-Cleaner
ADW-Cleaner is targeted towards adware and browser afflicting malware. It isn’t a great scanner alone, but used in combination with these previous two scanners its a great finisher.
- Download and install ADW-Cleaner.
- Once open, select Scan. A scan will run.
- Once complete, make sure all treats are checked and select clean.
- Before selecting clean, make sure you are in the clear to do a restart. At the end of the cleaning process ADW-Cleaner performs a restart on your computer with much of a warning.

4.0 Getting Rid of Malware: Mac Computers
You can get Malware on Macs too! Apple, as well as other Mac users, will tell you “Macs don’t get viruses”. Macs can get viruses and other malware too, albeit it is a lot less common for a Mac to get a malware infection. Because of this, malware scanners on Mac aren’t as developed as their Windows equivalents. However, there has been a boom in anti-malware software for Macs lately! Below are some recommended scanners for Macs. These are scanners I have used and can recommend. Be sure to run more than one kind of scanner if you want the best results. These are all free scanners.
Please note: Mac anti-malware scanners can take several hours to scan.
5.0 Post-Malware Removal
The process after you have removed malware is tricky because everyone’s circumstances are different. Here is what I’d advise to after you’ve done your malware removal.
5.1 Run Another Scan
Once you’re done and you want to be confident your infection is gone, just run another scan. A singular MalwareBytes scan is fine and you don’t even need to be in safe mode. If threats continue to be found go to the section below ‘Malware Removal Stage Two’.
5.2 Back to Normal Trial
I always advise to do sort of a trial run. Use your computer as you normally would for a few hours or a day. If you are seeing any of the symptoms that you had beforehand, the job may not be complete. Run another scan after this trial, whether or not your symptoms re-occur. If no threats found and you are still having issues, your problems may not be malware related. If threats continue to be found go to the section below ‘Malware Removal Stage Two’.
6.0 Malware Removal Stage 2
If you are still infected after doing your initial malware removal then you have a more deeply rooted infection. Here are some things I recommend to do.
6.1 System Restore
If you’re lucky enough, you have system restore points available to you.
- To run system restore, select your windows key and enter ‘rstrui.exe’.
- This will open your system restore. Go through the System Restore menu and you will find your restore points.
- If you have no restore points you cannot use System Restore to help you in this case.
- Select a restore point that you believe is before your infection or symptoms.
- If there isn’t a restore point far enough back. I don’t recommend doing a System Restore. It won’t hurt, but it won’t help.
- Run the System Restore.
- System Restore has long been a buggy Windows feature. I have had more fail on me than I have had successful.
- If it does fail, try a different restore point. If all restore points fail, attempt from Safe Mode. If those fail, System Restore isn’t going to work for you.
- Once you have a successful restore, I would re-scan the computer and follow any malware removal procedures you had done before the scan. This way you are sure your restore is clean.
For Mac users, if you have a Time machine backup, use that if you can. Guide on how to use Time Machine can be found here.
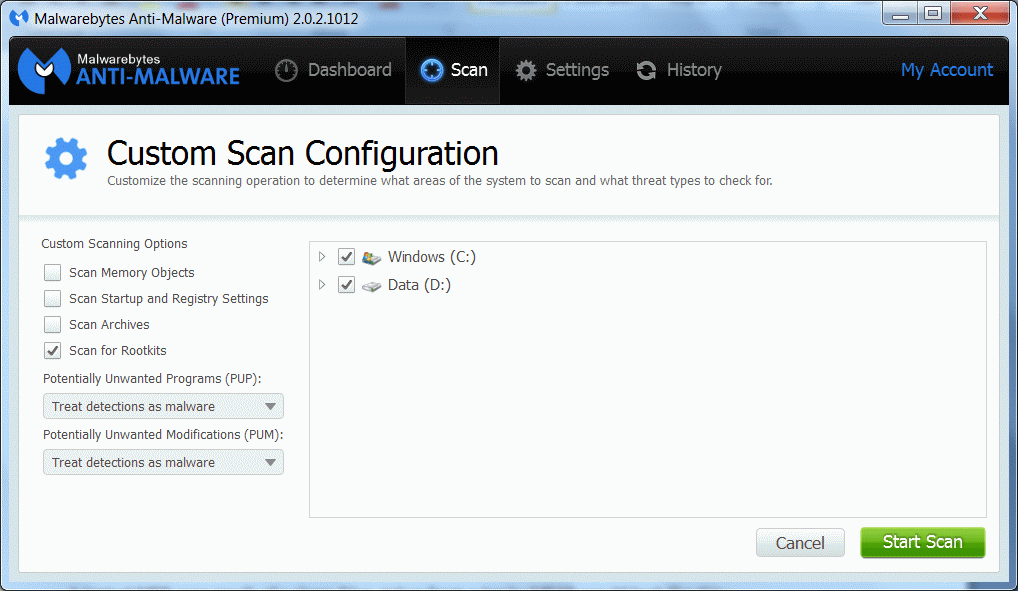
6.2 Run a Rootkit Scan
MalwareBytes has an option to scan for rootkits. This is a secondary scanner and MalwareBytes generally doesn’t look for these automatically. Mac users should use ESET’s rootkit tool. Rootkit scanners are still being developed for Mac and we will have more as time goes on!
To run a rootkit scan under Malwarebytes, go to the scan tab. Do a custom scan and check off the ‘Scan for rootkits’ option. It will look like the photo below.
6.3 Research Your Symptoms
Like a real life disease, malware gives off symptoms. We can diagnose what kind of malware is present by researching the symptoms in a search engine. Forums posts on sites such as Tom’s Hardware are great resources to diagnosing your malware infection. Once you have an idea of what the diagnosis is, you can research and see what tools or scanners will remove it. Be careful of what you download to remove the infection, you can easily download malicious software and only worsen your infection. If you need to verify the validly of the download, research the download site itself.
6.4 Operating System Reinstall
A re-installation of your operating system is your best option for any deep infection and honestly if you have a very infected computer, I recommend doing this anyways. Reinstalling the operating system is a very involved process and may be beyond the skills of the average computer user. If you don’t feel comfortable doing this, that is fine. I recommend taking it to a pc repair shop or finding that one person you know who’s good with computers to help you. Here is a guide on how to perform a reinstall of your operating system.
6.41 Backup Your Files!
A reinstall of your operating system may delete all your files, so you will need to have a backup of all your data. How you backup your data is up to you. Remember to get the data for all users of your computer, not just yourself. There are several different ways to backup your data, here are some guides on how to do that. However you wish to backup your files, move them to an external source. This external source can either be a flash drive, external drive, or cloud/internet storage. Once you have backed up your files, go through your backup if you can and verify you have what you need backed up. You do not want to lose any files from your re-installation of the operating system, getting them back can be very difficult. Again, if you are uncomfortable, get help!
Extra Tip for Windows users: Do not backup your App Data folders. This is a hidden folder so you may not even see it or select it. If do come across these files, do not back them up or restore them. Malware commonly live in these folders.
6.42 Backup Your Programs and Keys!
All your programs you have installed will be wiped in your system wipe. Programs such as your web browsers are usually free to install and can be reinstalled with ease. Any software that you have bought and have a key for, make sure you have the install file/disk and keys before you do your wipe. Make sure you can reinstall any necessary software before you wipe your computer. Unlike your files, if wiped, they can be impossible to get back. Again, if you are uncomfortable, get help!
6.43 Reinstalling Windows 10/8
Reinstalling Windows 10 and 8 is actually very easy and you don’t have to worry about losing your files with this method. Here is how to do that.
Windows 10
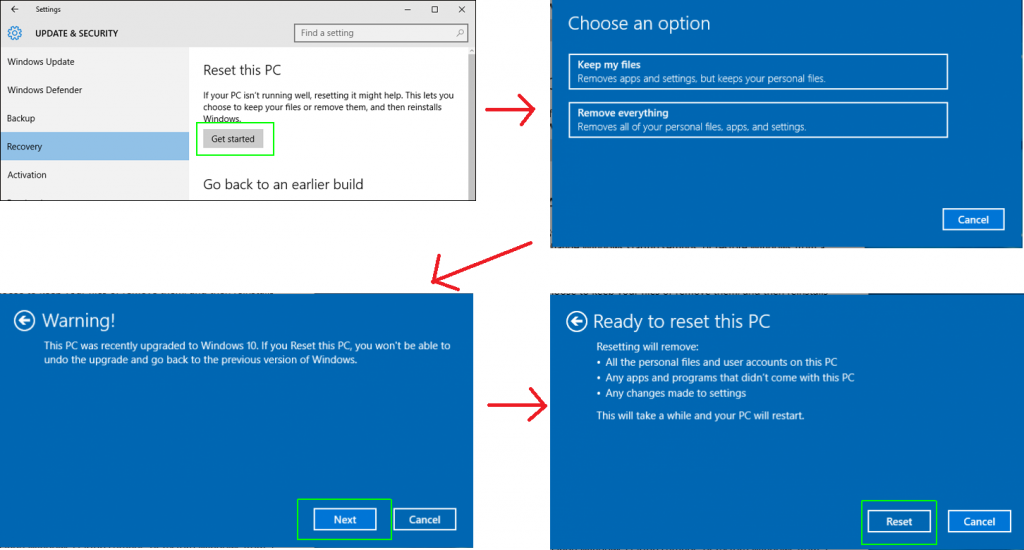
- Hit your Windows key and enter ‘reset’ into the search menu/bar. Choose the ‘Reset this PC’ option.
- This will open a new window. Under that window select the ‘Get Started’ under the ‘Reset this PC’ option.
- This will open a new window and will ask you if you want to keep your files or remove everything. Keep your files.
- Let the reset run its course. Once it is done, you will have a fresh reinstall of Windows 10.
- While it kept your files, you will need to reinstall any programs lost in the reinstall.
Windows 8
- Go to your Settings (windows key + i). Select ‘Change PC Settings’.
- Under ‘General’ you will find the ‘Refresh your PC without affecting your files. Select the ‘Get started’ option underneath that.
- Go through the menu that opens up and let the reset run its course.
- Let the reset run its course. Once it is done, you will have a fresh reinstall of Windows 8.
- While it kept your files, you will need to reinstall any programs lost in the reinstall.
6.44 Reinstalling Windows 7 and Below
Reinstalling the operating system any operating system that is Windows 7 or earlier is much more difficult. Chances are, your computer manufacturer has a built-in factory reset option. To find out if you do have this, take your computer make/model and enter it into a search engine followed by ‘factory reset’. For example, ‘Dell Latitude E6540 factory reset’. You will find results for your device either in forum results or your manufacturer will have a guide posted as well. If you do not find any results, you have a custom built computer, or the factory reset didn’t work for you, you will have to reinstall the operating system via disk or USB. Here are some guides on how to do this for Windows 7, and XP. Before you do this, attempt to find your Windows activation key. For laptops, the key will be on the bottom somewhere. For Desktops, the key will be on the unit itself. Both of these are in form of a sticker. Unfortunately, these stickers can wear off and make the key impossible to read. If you bought Windows, find your disk case, the key will be on or inside that. If you don’t have a key or can’t read your key you may have to purchase another copy of Windows. Once you have reinstalled your operating system, restore your files and reinstall your programs.
Please note: Windows keys can only be used with the install it was designed for. For example, a Windows 7 32-bit Home key will not work with Windows 7 Professional, nor any 64 bit versions, and nor will it work with Windows XP, Vista, or any other Windows versions. It will only work for Windows 7 32-bit Home, nothing else.
6.45 Reinstalling Mac Operating Systems
Rarely will you have to reinstall an operating system on a Mac because of malware. Apple has several iterations of their operating system OSX. The re-installs for each of their operating systems are slightly different, but in the end they are very much the same. Older versions of Mac OSX have to be installed with a disk, a guide on how to do that is here. Newer versions of Mac OSX can be installed over a network. So as long as you have an internet connection, you can reinstall your OSX with ease. A guide on how to do that is here. If you need to find a specific guide on how to reinstall your specific version of Mac OSX, enter in your version of Mac OSX followed by ‘how to reinstall’ into a search engine. Tons of guides exist for these and they often feature images to help you with your process.
7.0 Congrats You’re Malware Free!
Good news! You have reached the end of the guide, as long as it is. Hopefully your computer is now malware free or you have become much more well informed in malware removal. For those who had to do the reinstall of their operating system, reinstalling your operating system can be a pain and it is can definitely be argued as an over-reactionary solution to get rid of malware. However, a reinstall of your operating system will defeat any malware in your system and it always works. Many IT support centers automatically do an operating reinstall when malware is found because it works so well. The downside is the work you will have to do to get your computer running the way you like it. Now that your computer is malware free, I recommend reading up on how to avoid malware in my last blog post.