When we talk about PDF accessibility, the source document is the original file that the PDF is created from. This can be a Word document, InDesign, or a Canva template, to name a few.
If the source document is created with accessibility in mind, then it can be exported to a more accessible PDF.
Starting with an accessible source document can save you time as there will be fewer items to fix in Foxit PDF Editor Pro.
- Part 1: Introduction
- Part 2: Source Documents
- Part 3: PDF Remediation in Foxit
What should an accessible source document include?
Accessible documents are structured in a way that makes them easy to read and navigate for assistive technology users. Accessible documents include the following:
- Document metadata for title
- Headings that make content easier to navigate
- Images with alt text
- Descriptive text for links
- Avoiding color reliance to convey information
- Sufficient color contrast for text and backgrounds
- Tables with header rows, alt text, and simple structure
- Lists for scannable content
After applying the above best practices as needed, you can check your work with Word’s built-in accessibility checker. Then be sure to save your document as a PDF using options for digital accessibility.
Once you are done with the source document, move on to checking the exported PDF’s accessibility in Foxit PDF Editor Pro.
For this guide, we’ll use a Microsoft Word document for our example. However these same tools and concepts can be applied in other programs, such as InDesign and Publisher.
If you are creating a PDF with Canva
Canva does not export PDFs with tags at this time. As a result, PDFs created with Canva must have tags added using Foxit PDF Editor Pro.
If you are working on a Canva document, review this guide for awareness, but focus on the sections about avoiding color reliance, and using sufficient color contrast. Then move on to Make PDFs Accessible with Foxit PDF Editor Pro: Part 1.
Document metadata for title
Document metadata provides screen readers and search engines meta information that makes the document more searchable. Therefore, document metadata should always include an accurate title.
The title should be relevant and is usually what you would use as the first heading in the document.
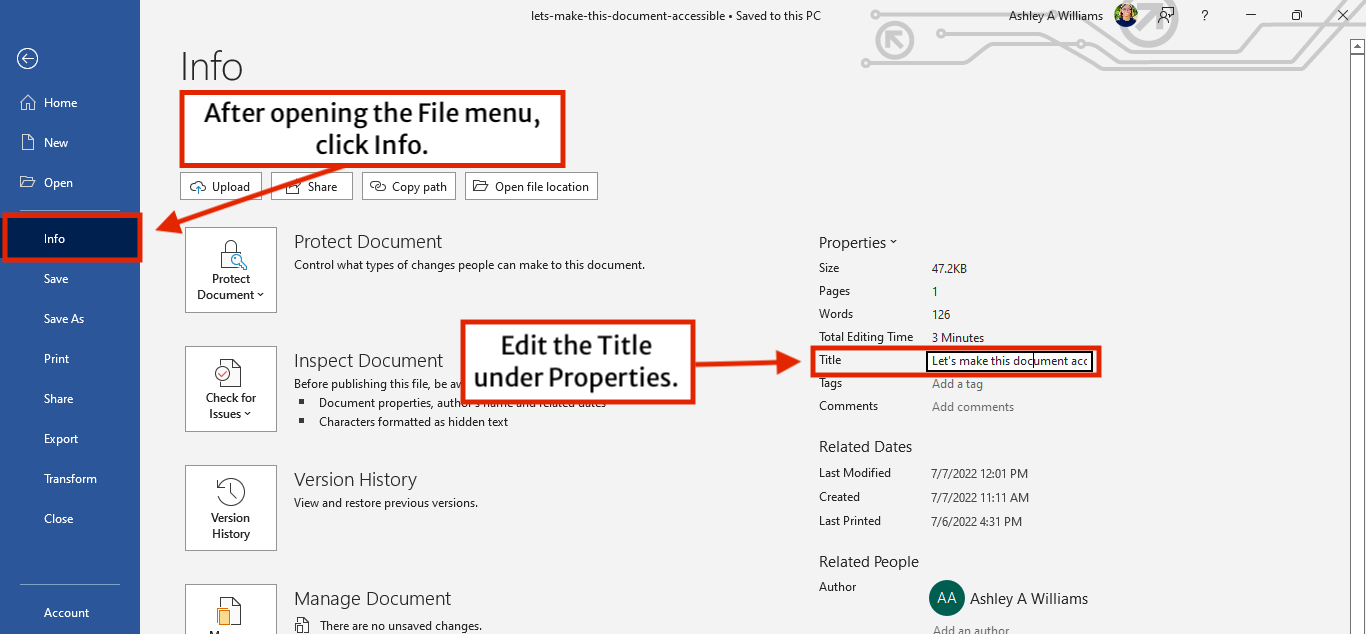
To find the document properties in Word:
- Go to File > Info. Properties will be listed on the right hand side of the screen.
- Under Properties, add the Title by clicking “Add a title” text, and then typing in your title.
- Save your changes.
Headings that make content easier to navigate
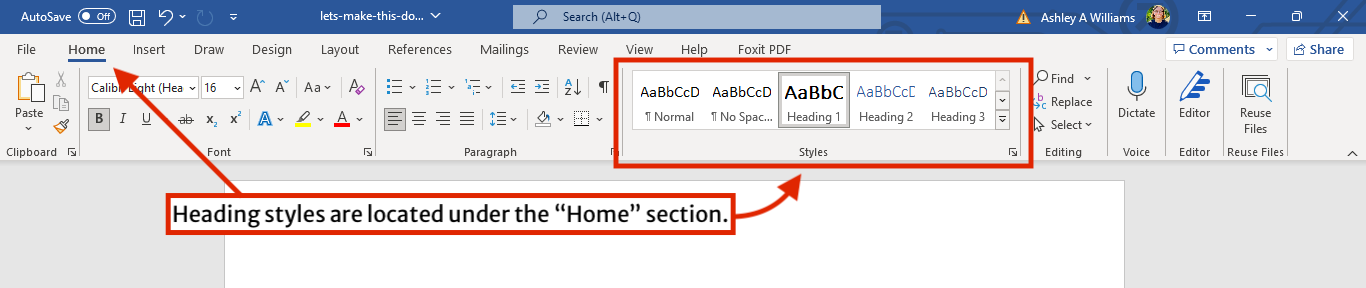
Use built-in heading styles to organize the content in your document. Built-in headings provide an easy to navigate outline of the document for assistive technology users.
This doesn’t mean just making text bigger using the font options, but using the predefined “Heading 1,” “Heading 2,” etc., styles that are in the styles menu under the “Home” tab.
Heading 1 should be used only once for the title of your document.
Update default heading styles
Optionally, you can change the default appearance of heading styles. This allows you to style headings for your needs, while also using them to add an accessible outline.
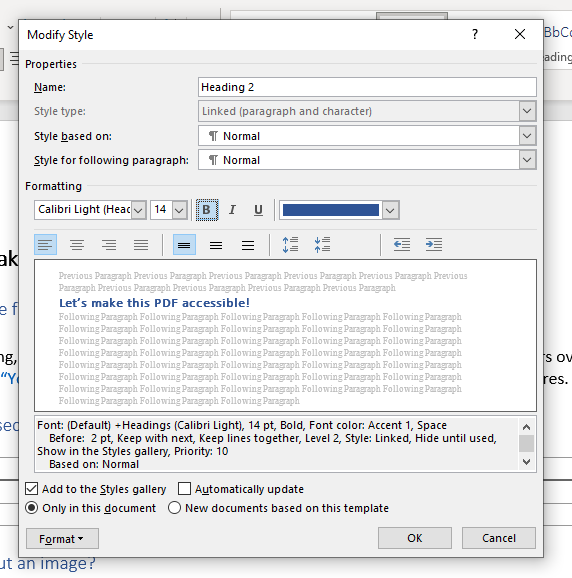
To update the appearance of a heading style in Word:
- Under the Home tab, locate and right click the heading style you want to change. Select “Modify.”
- In the “Modify Style” window, make your changes to the heading style with the options. Once done, click “OK.“
- Your headings that already use the heading style should update.
- Save your changes.
Images with alt text
All images in your document should include alt text. Alt text can be read by screen readers, and should accurately and concisely describe the image.
To add alt text to an image in Word:
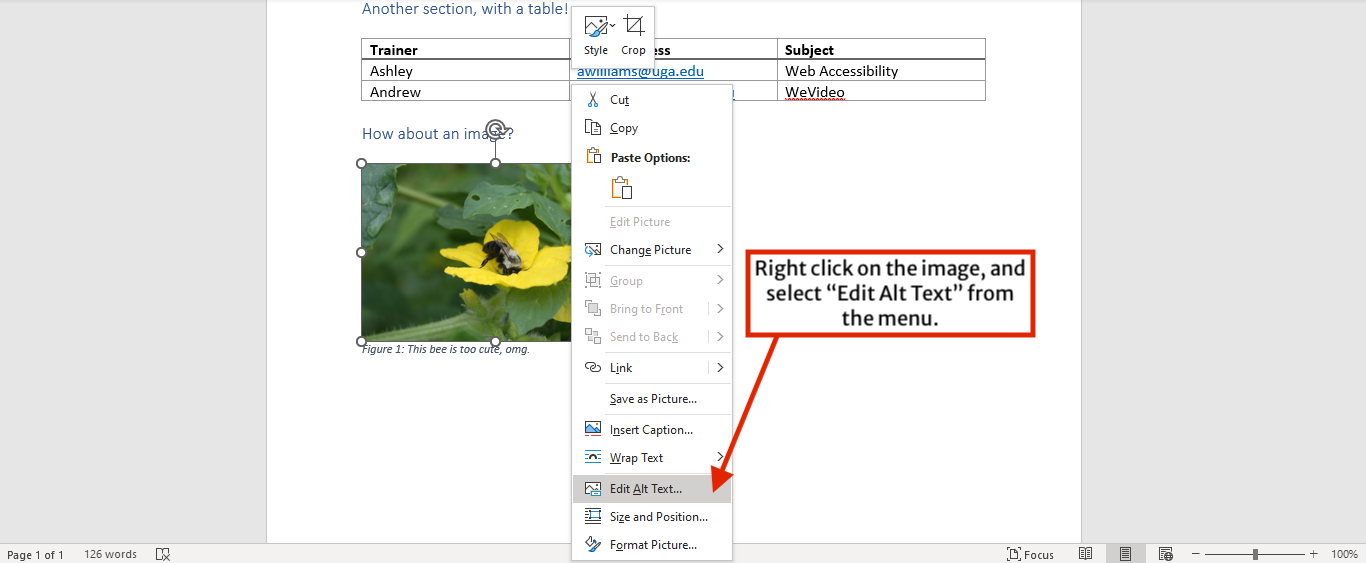
- Select the image in your document and right click. Select “Edit Alt Text” from the menu.
- In the Alt Text pane, add your alt text to the field. If the image is decorative – like a decorative border or some other element that doesn’t add meaning to the document – then you can instead check the box for “Mark as decorative“.
- Save your changes.

The Alt Text pane for images has a “Generate alt text for me” button in Word. You can use this option, but be sure to check and correct the generated alt text for accuracy. Does it get across what you want the reader to know about the image?
Descriptive text for links
Link text should be descriptive in your document. Avoid vague link text like “click here,” “learn more,” “info,” etc.
Instead, your link text should describe where it will take the visitor. This can be the page title of the page you’re linking, or a specific call to action. E.g.: “Summer Camp Schedule” and “Contact your local office.”


Never use web addresses as link text
Link text should never be a web address. For example, never have your link text be addresses like: “https://extension.uga.edu/topic-areas/animal-production/dairy.html.” Instead, use something more human friendly and readable. Example: “Dairy Resources on UGA Extension.”
Keep links on one line of text
Finally, avoid allowing link text to span more than one line of text. This will result in two links that go to the same destination on two separate links, and with incomplete link text for each.


Avoid color reliance to convey information
Do not rely on color to convey information. Color reliance can be a problem for users with low vision, color perception deficiencies, and color blindness.
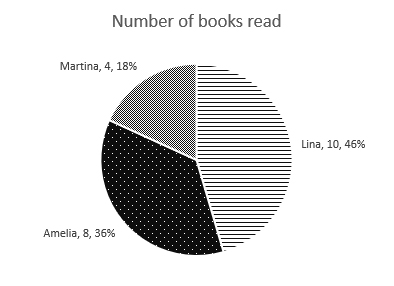
Use other visual cues in addition to color for charts and graphs
Make sure charts and graphs in your document use other visual cues, in addition to color, to represent information. For example, you can use direct text labels on parts of graphs, or use patterns in addition to colors. Also, remember to add alt text to images of charts!
Include underlines on links
Links should include other visual cues (apart from color) to indicate they are clickable. The standard is that links are also underlined. This means you should also avoid underlining text that isn’t a link!

Sufficient color contrast for text and backgrounds
Text in your document should have sufficient color contrast against the background. Text with low color contrast against its background has poor legibility, and can be a problem for users with certain types of color blindness, or have trouble differentiating between similar colors.
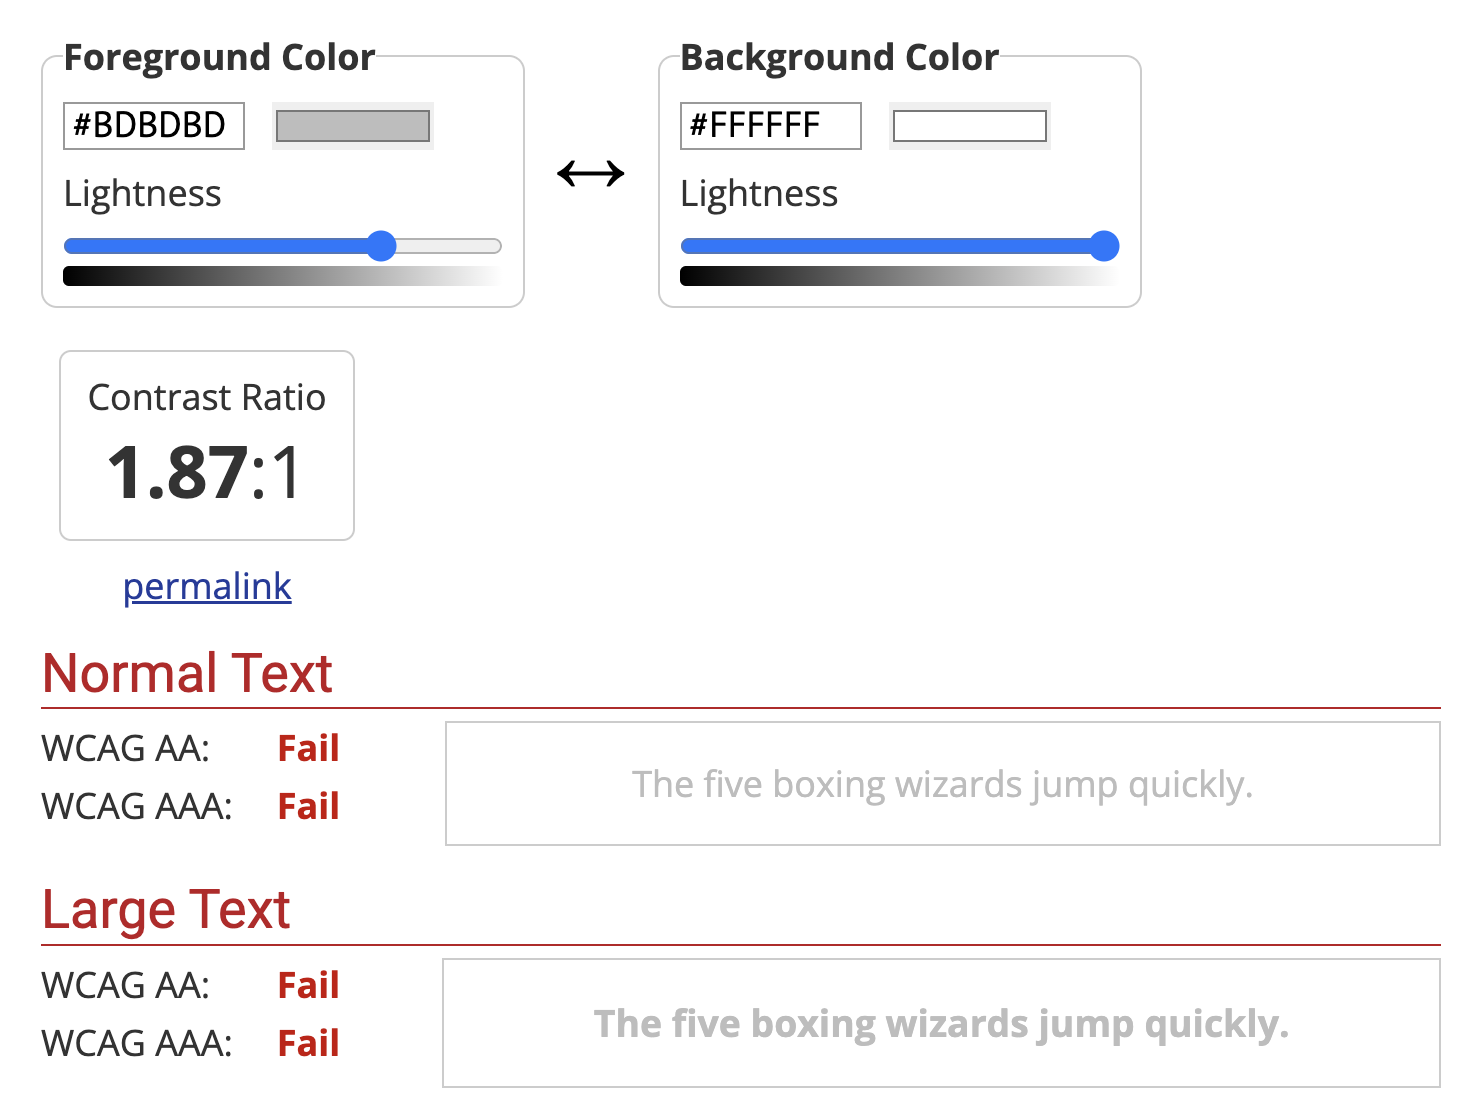
A color contrast ratio of 4.5:1 is required for text smaller than 14 pt, and 3:1 for larger than 14 pt. This meets minimum requirements for WCAG level AA.
Black text (hex code #000000) on a white background (#ffffff) is safe to use, with a color contrast ratio of 21:1. You can manually check other color combinations using WebAIM’s Contrast Checker.

Tables with header rows, alt text, and simple structure
Table headers
Make sure tables in your document include a header row. Header rows provide context for body cells to screen reader users as they navigate the table.
To add a header row to a table in Word:
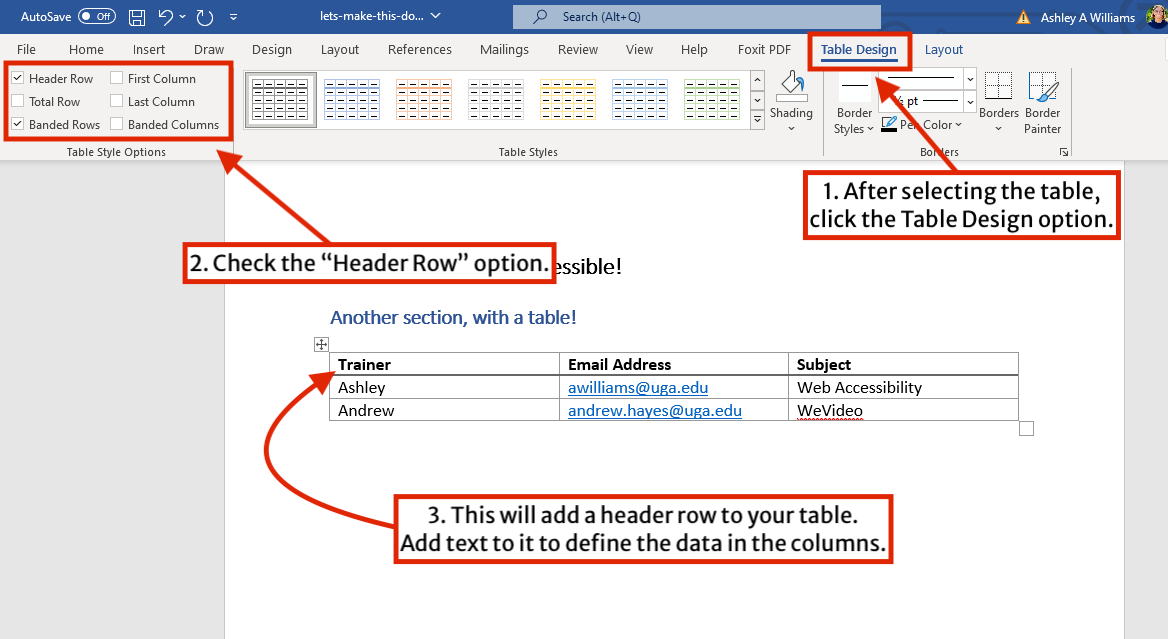
- After inserting a table, select the table and click on the “Table Design” option from the top menu.
- Check “Header Row.” This will set the first row to be a header, and will change its design accordingly.
- Add text to your header row to define the data in the column.
- Save your changes.
Alt text for tables
Tables in your document should include a title and alt text. Both are read aloud to a screen reader user. The title allows the user to determine if they want to hear the description. The description should be a summary of the information conveyed in the table that sighted users would get from scanning it.
To add alt text to a table in Word:
- Right click anywhere on the table. Select “Table Properties” from the menu.
- In the “Table Properties” window, go to the “Alt Text” tab.
- Fill in the title and the description. When done, click “OK“.
- Save your changes.


Simple structure
When adding tables to your document, it’s best to keep their structure simple. This means avoid merging table cells and applying more than one “header” row or column.
While not impossible, it takes time and skill to make complex tables accessible for assistive technology users. Opt for simpler tables when possible. When there are no other options, reach out to the Web Team for guidance on making complex tables accessible.

Long tables that span multiple pages
If you have a long table that spans multiple pages, be sure to turn on “repeat header rows.” You can do this by:
- Click inside the table
- From the top menu, select the “Layout” tab
- Click “Repeat Header Rows”
Lists for scannable content
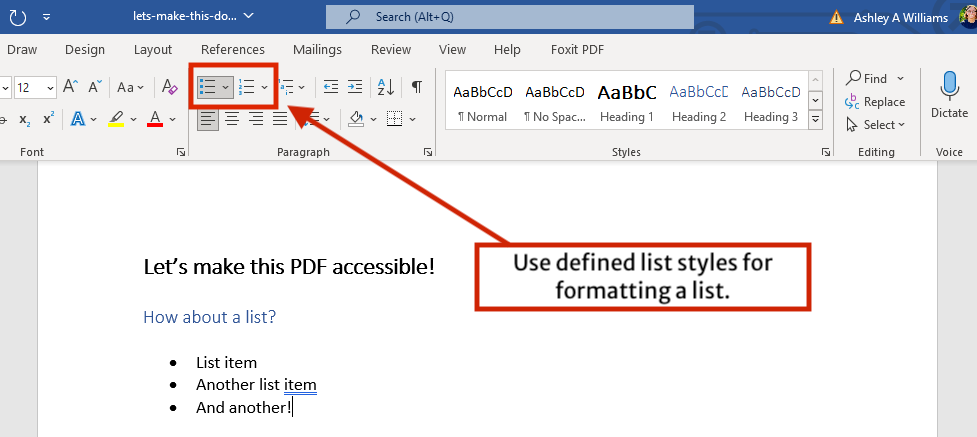
Often we use numbered or bulleted lists to help summarize information, and make it more scannable.
Be sure to use the built-in list formatting options when making lists, instead of manually typing in numbers or bullets. The defined list styles will provide a structure that makes it scannable for a screen reader user.
In Word, you can find the list styles under Home > Paragraph.
Accessibility Checker
Microsoft Word (and other programs) have built-in accessibility checks. These automated checks will find obvious accessibility issues in your document, such as missing alt text or missing table headers.
Note that the accessibility checker does not check the quality of these items. For example, it can only check if alt text is present, but it can’t check if it describes the image accurately. It is up to you to manually review items like alt text to ensure they are useful.
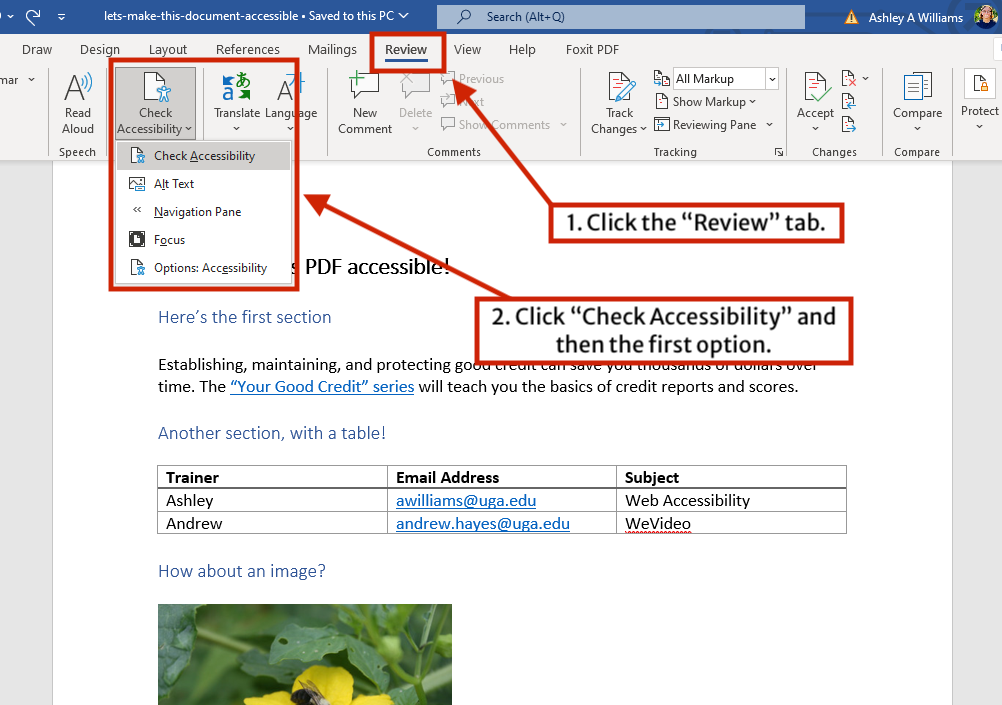
To access the accessibility checker in Word:
- Click the “Review” tab in the top menu.
- Click “Check Accessibility” and then click the first option (also named “Check Accessibility“).
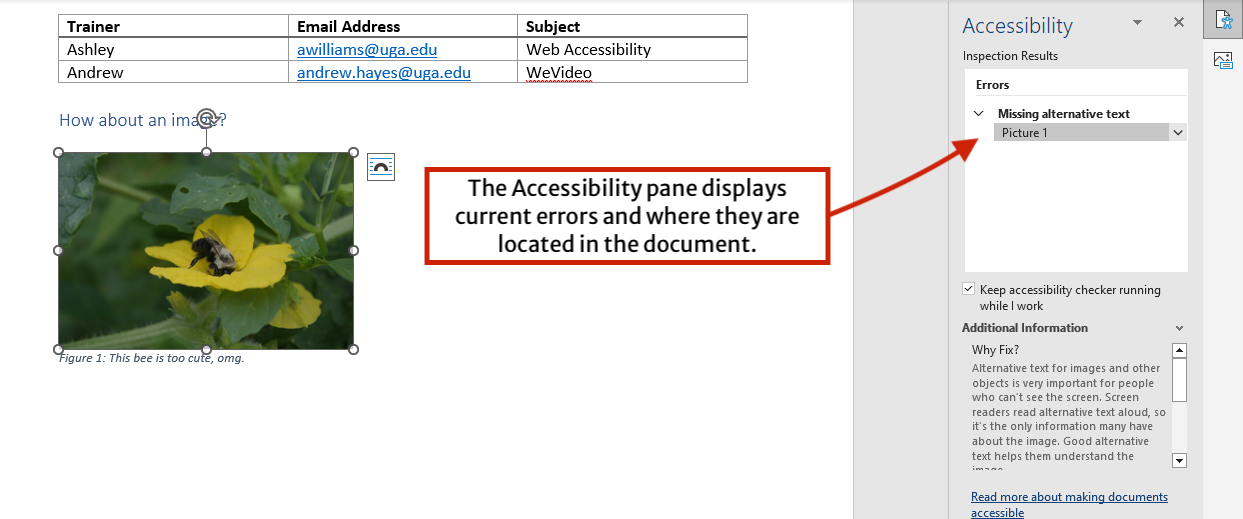
- This will open the Accessibility pane. Errors the checker has found, and where they’re located , will be listed. Review and make corrections as needed.
Saving as a PDF
When it’s time to save your document as PDF, do not use the “Print as PDF” option. This option exports a PDF that is ideal for print, but not for digital accessibility, and will remove the accessibility features you have added so far.
Instead, save your PDF using these steps:
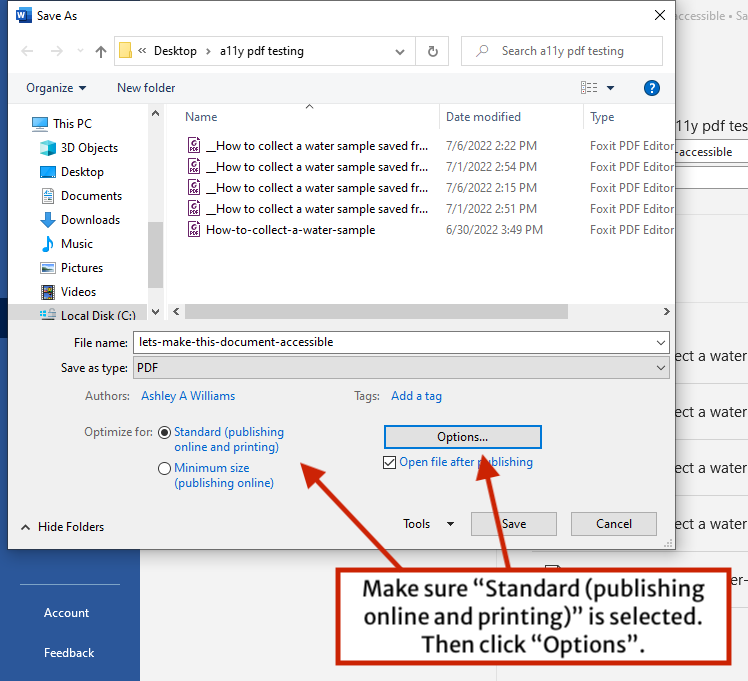
- Select File > Save As.
- Under the file name, click the dropdown menu and select “PDF” from the list of file types. Then click “More Options.”
- In the Save As window, make sure that “Standard (publishing online and printing)” is selected from the “Optimize for” options. The click the “Options” button.
- Ensure that “Document structure tags for accessibility” is checked. Click OK.
- Save your PDF.


Checking PDF accessibility in Foxit PDF Editor Pro
We’re not done yet! The final step is to open your saved PDF in Foxit PDF Editor Pro and check the document’s “tags.” Tags in PDFs are key to accessibility because they communicate the structure and types of content to assistive technology.
Move on to PDF Accessibility Part 3: Remediation in Foxit PDF Editor Pro.
Need help?
If you have questions regarding PDF and document accessibility, please reach out to the Web Team at caesweb@uga.edu.