Did you know that Microsoft Word has a transcription feature?
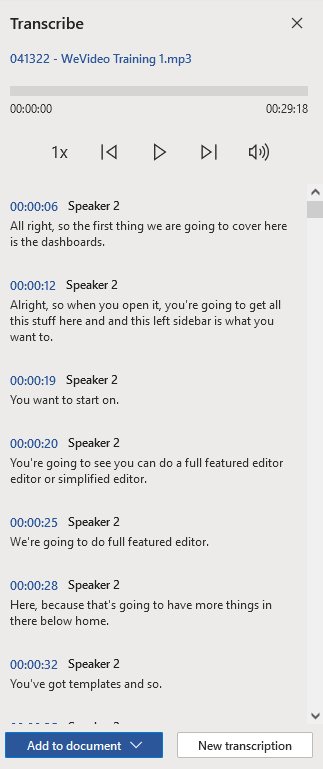
The transcribe feature converts speech to a text transcript with each speaker individually identified (Speaker 1, Speaker 2, etc.).
You can transcribe speech in two ways:
And after transcribing your conversation, interview, or meeting, you can make any needed corrections to the transcription by revisiting parts of the recording by playing back the timestamped audio and editing accordingly.
Record directly in Word
You can record directly in Word while taking notes in the document and then transcribe the recording after. Word transcribes in the background as you record, meaning you won’t see text on the page as you would when dictating. You will see the transcript after you save and transcribe the recording.
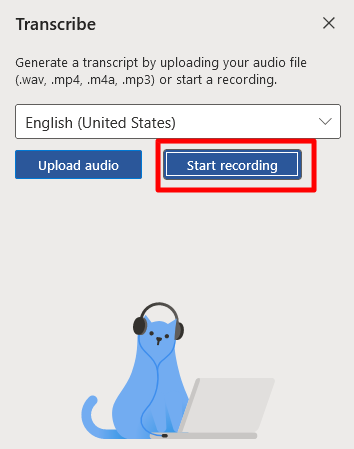
- Make sure you are signed into Microsoft 365
- Open a new Word file
- Click on Home > Dictate (drop-down arrow) > Transcribe


- In the Transcribe pane, click Start recording
- If this is your first time live transcribing, you may need to give the browser (or computer) permission to use your mic. There might be a dialog that pops up in the browser or you may have to go to the browser settings.
- Wait for the pause icon to be outlined in blue and the timestamp to start moving to let you know that recording has begun
- You can pause the recording by clicking the Pause button and click the Microphone icon to resume recording
- Leave the Transcribe pane open while recording
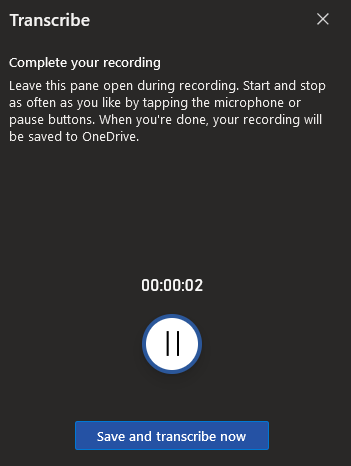
- When you finish, click Save and transcribe now to save your recording to you OneDrive and start the transcription process
- Reminder, unlike a Dictation, you won’t see the transcript until you click Save and transcribe now
- Transcription may take a while depending on your internet speed. Keep the Transcribe pane open while the transcription is being made.
Upload an audio file
You can upload a pre-recorded audio file and then transcribe the recording. At this time, you’re limited to five hours of transcription time per month for uploaded recordings.
Information
All audio files are uploaded and saved in your OneDrive in a Transcribed Files folder
- Make sure you’re signed in to Microsoft 365
- Go to Home > Dictate (drop-down arrow) > Transcribe.
- In the Transcribe pane, select Upload audio.
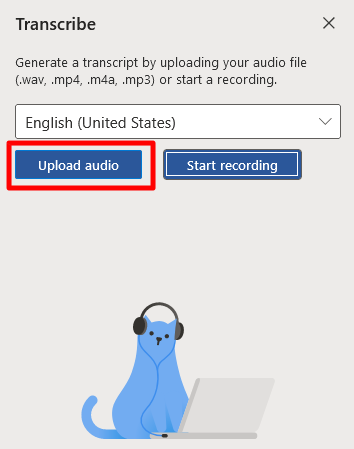
- Located and select your audio file
- Transcribe currently supports .wav, .mp4, .m4a, .mp3 formats.
- Transcription may take a while depending on your internet speed, up to about the length of the audio file. Be sure to keep the Transcribe pane open while the transcription is happening, but feel free to do other work or switch browser tabs or applications and come back later.
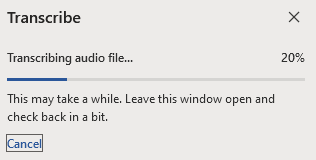
- After the audio file has finished processing, the Transcribe side bar will have more information
Recording done! Now on to editing and adding to the document.
Now that you have finished recording, let’s move on to how you can edit the speaker names, edit the text transcription and add the text to the document.
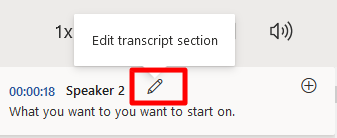
Relabel a speaker or edit a section
The transcription service identifies and separates different speakers and labels them “Speaker 1,” “Speaker 2,” etc. You can edit the speaker label and change all occurrences of it to something else. You can also edit the content of a section to correct any issues in transcription.
- In the Transcribe pane, hover over a section you want to edit.
- Select the Edit transcript section icon
- Edit the content or change the label. To change all instances of a label, select the Change all Speaker [x] checkbox
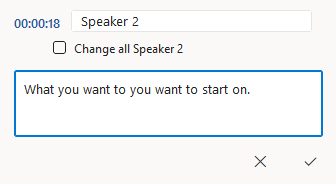
- To save your changes, select the Confirm icon (check mark)
- Once you have finished editing speaker names and sections,
Add the transcript to the document
There are 2 methods to add the transcript to the document:
Add a specific section
- To add a specific transcription section, hover over the section and select the Add section to document icon (Plus button)
Add entire transcript
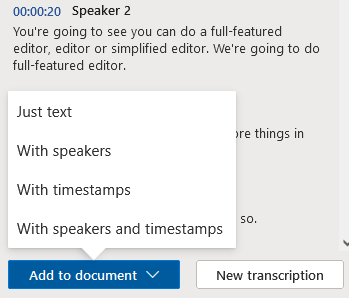
- To add the entire transcription to the document, select Add to document
- You will have some additional options if you click the drop-down arrow
Important
For more information about transcribing using Word, visit Transcribe your recordings